
HP-UX System Administrator's Guide: Logical Volume Management (762803-001, March 2014)
4.7.6 Step 6: Replacing a Bad Disk (Persistent DSFs)
If instead of removing the disk, you need to replace the faulty disk, this section provides a
step-by-step guide to replacing a faulty LVM disk, for systems configured with persistent DSFs. For
systems using legacy DSFs, refer to the next step “Step 7: Replacing a Bad Disk (Legacy DSFs)”
(page 145)
If you have any questions about the recovery process, contact your local HP Customer Response
Center for assistance.
Because disks are physical devices, their hardware can fail, necessitating their replacement. After
a failing disk is replaced with a new one (retaining the hardware address of the original disk to
avoid confusion), the data must be restored to that disk from a backup.
Since the disk was under LVM control, it can have physical extents for several logical volumes on
it. The layout of those logical volumes must first be restored and the data for each of those logical
volumes restored from backup (if the data is not on a mirror copy).
There are basically four scenarios for replacing a bad disk. Determine your particular case and
follow the steps provided for your scenario:
• “Replacing a Mirrored Nonboot Disk” (page 137)
• “Replacing an Unmirrored Nonboot Disk” (page 139)
• “Replacing a Mirrored Boot Disk” (page 142)
• “Replacing an Unmirrored Boot Disk” (page 144)
4.7.6.1 Replacing a Mirrored Nonboot Disk
Use this procedure if all the physical extents on the disk have copies on another disk, and the disk
is not a boot disk. If the disk contains any unmirrored logical volumes or any mirrored logical
volumes without an available and current mirror copy, see “Replacing an Unmirrored Nonboot
Disk” (page 139).
For this example, the disk to be replaced is at lunpath hardware path 0/1/1/1.0x3.0x0, with
device special files named /dev/disk/disk14 and /dev/rdisk/disk14. Follow these steps:
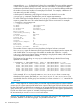
1. Save the hardware paths to the disk.
Run the ioscan command and note the hardware paths of the failed disk.
# ioscan –m lun /dev/disk/disk14
Class I Lun H/W Path Driver S/W State H/W Type Health Description
========================================================================
disk 14 64000/0xfa00/0x0 esdisk CLAIMED DEVICE offline HP MSA Vol
0/1/1/1.0x3.0x0
/dev/disk/disk14 /dev/rdisk/disk14
In this example, the LUN instance number is 14, the LUN hardware path is
64000/0xfa00/0x0, and the lunpath hardware path is 0/1/1/1.0x3.0x0.
When the failed disk is replaced, a new LUN instance and LUN hardware path are created.
To identify the disk after it is replaced, you must use the lunpath hardware path
(0/1/1/1.0x3.0x0).
2. Halt LVM access to the disk.
If the disk is not hot-swappable, power off the system to replace it. By shutting down the system,
you halt LVM access to the disk, so you can skip this step.
If the disk is hot-swappable, detach it using the –a option of the pvchange command:
# pvchange -a N /dev/disk/disk14
3. Replace the disk.
For the hardware details on how to replace the disk, see the hardware administrator's guide
for the system or disk array.
4.7 Disk Troubleshooting and Recovery Procedures 137