
HP-UX System Administrator's Guide: Logical Volume Management (762803-001, March 2014)


4.7.3 Step 3: Confirming Disk Failure
Once you suspect a disk has failed or is failing, make certain that the suspect disk is indeed failing.
Replacing or removing the incorrect disk makes the recovery process take longer. It can even cause
data loss. For example, in a mirrored configuration, if you were to replace the wrong disk—the
one holding the current good copy rather than the failing disk—the mirrored data on the good
disk is lost.
It is also possible that the suspect disk is not failing. What seems to be a disk failure might be a
hardware path failure; that is, the I/O card or cable might have failed. If a disk has multiple
hardware paths, also known as pvlinks, one path can fail while an alternate path continues to
work. For such disks, try the following steps on all paths to the disk.
If you have isolated a suspect disk, you can use hardware diagnostic tools, like Support Tools
Manager, to get detailed information about it. Use these tools as your first approach to confirm
disk failure. They are documented on http://docs.hp.com in the Diagnostics area. If you do not
have diagnostic tools available, follow these steps to confirm that a disk has failed or is failing:
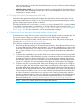
1. Use the ioscan command to check the S/W state of the disk. Only disks in state CLAIMED
are currently accessible by the system. Disks in other states such as NO_HW or disks that are
completely missing from the ioscan output are suspicious. If the disk is marked as CLAIMED,
its controller is responding. For example:
# ioscan –fCdisk
Class I H/W Path Driver S/W State H/W Type Description
===================================================================
disk 0 8/4.5.0 sdisk CLAIMED DEVICE SEAGATE ST34572WC
disk 1 8/4.8.0 sdisk UNCLAIMED UNKNOWN SEAGATE ST34572WC
disk 2 8/16/5.2.0 sdisk CLAIMED DEVICE TOSHIBA CD-ROM XM-5401TA
In this example, the disk at hardware path 8/4.8.0 is not accessible.
If the disk has multiple hardware paths, be sure to check all the paths.
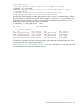
2. You can use the pvdisplay command to check whether the disk is attached or not. A physical
volume is considered to be attached, if the pvdisplay command is able to report a valid
status (unavailable/available) for it. Otherwise, the disk is unattached. In that case, the disk
was defective or inaccessible at the time the volume group was activated. For example, if
/dev/dsk/c0t5d0 is a path to a physical volume that is attached to LVM, enter:
# pvdisplay /dev/dsk/c0t5d0 | grep “PV Status”
PV Status available
If /dev/dsk/c1t2d3 is a path to a physical volume that is detached from LVM access using
a pvchange –a n or pvchange –a N command, enter:
# pvdisplay /dev/dsk/c1t2d3 | grep “PV Status”
PV Status unavailable
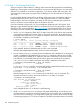
If the disk responds to the ioscan command, test it with the diskinfo command. The
reported size must be nonzero; otherwise, the device is not ready. For example:
# diskinfo /dev/rdsk/c0t5d0
SCSI describe of /dev/rdsk/c0t5d0:
vendor: SEAGATE
product id: ST34572WC
type: direct access
size: 0 Kbytes
bytes per sector: 512
In this example the size is 0, so the disk is malfunctioning.
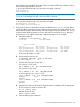
3. If both ioscan and diskinfo succeed, the disk might still be failing. As a final test, try to
read from the disk using the dd command. Depending on the size of the disk, a comprehensive
read can be time-consuming, so you might want to read only a portion of the disk. If the disk
is functioning properly, no I/O errors are reported. The following example shows a successful
128 Troubleshooting LVM