
HP-UX 11i v3 Using LVM Logical Volume Snapshots (September 2010)


31
Note
The changes are not reflected in its snapshot. (/mnt_S2 does not
have file5)
4. During the write operation to the original logical volume, ensure that the threshold is not reached
on its space-efficient snapshot. If the threshold is reached, increase the number of extents in the
pre-allocated pool as explained in
Extending the pre-allocated extent pool or enable the automatic
increase of pre-allocated extents as explained in
Enabling the automatic increase of pre-allocated
extents. Failing to do so can make the space-efficient snapshot over-commit and inoperative.
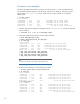
# lvdisplay /dev/vg01/lvol1_S2
--- Logical volumes ---
LV Name /dev/vg01/lvol1_S2
VG Name /dev/vg01
LV Permission read-only
LV Status available/syncd, snapshot,space efficient
Snapshot Status inoperative/over-commit
Mirror copies 0
Consistency Recovery MWC
Schedule parallel
LV Size (Mbytes) 10240
Current LE 1280
Allocated PE 50
Stripes 0
Stripe Size (Kbytes) 0
Bad block NONE
Allocation strict
IO Timeout (Seconds) default
Pre-allocated LE 50
Current pre-allocated LE 0
Unshared LE 50
Current pre-allocated PE 0
Original LV /dev/vg01/lvol1
Timestamp Tue Jan 26 16:56:37 2010
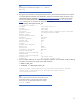
5. You can neither read from nor write to an inoperative snapshot. You must delete it. Before deleting
a snapshot, unmount the file system (if mounted) as follows:
# umount /mnt_S2/
# lvremove -f /dev/vg01/lvol1_S2
Logical volume "/dev/vg01/lvol1_S2" has been successfully removed.
Volume Group configuration for /dev/vg01 has been saved in
/etc/lvmconf/vg01.conf
Note
When a snapshot becomes inoperative, all its predecessors are
also marked inoperative, if they share data with the snapshot.
In these cases, you can delete all the predecessors using the
lvremove -F option).