
HP-UX 11i v3 LVM Volume Group Migration

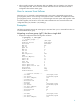
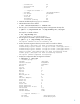
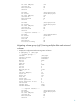
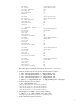
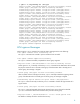
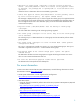
Table Of Contents
...Current LE 20
...Allocated PE 20
...Used PV 1
--- Physical volumes ---
...PV Name /dev/disk/disk116
...PV Status available
...Total PE 63
Free PE 3
Autoswitch On
Proactive Polling On
2. Generate the diskmap file using vgmove command.
3. Add the destination disk as follows:
# echo "/dev/disk/disk117" > newdisk.txt
4. Run the vgmove command with following options to autogenerate the map file:
# vgmove -i /tmp/newdisk.txt -f /tmp/diskmap.txt /dev/vg01
The map file is created as follows:
# cat /tmp/diskmap.txt
/dev/disk/disk116 /dev/disk/disk117
5. Run the vgmove command in preview mode as follows:
# vgmove -p -f /tmp/diskmap.txt /dev/vg01
The vgmove command can be successfully run.
6. Perform the actual migration after the preview mode is successful as follows:
Volume group "/dev/vg01" has been successfully extended.
Transferring logical extents of logical volume "/dev/vg01/lvol1"...
Transferring logical extents of logical volume "/dev/vg01/lvol2"...
Transferring logical extents of logical volume "/dev/vg01/lvol3"...
Physical volume "/dev/dsk/c5t1d1" has been successfully moved.
Volume group "/dev/vg01" has been successfully reduced.
The vgmove command completed successfully.
7. Display the configuration after the migration as follows:
# vgdisplay -v /dev/vg01
--- Volume groups ---
VG Name /dev/vg01
VG Write Access read/write
VG Status available
Max LV 255
Cur LV 3
Open LV 3
Max PV 16
Cur PV 1
Act PV 1
Max PE per PV 1016
VGDA 2
PE Size (Mbytes) 32
Total PE 63
Alloc PE 60
Free PE 3
Total PVG 0
Total Spare PVs 0
Total Spare PVs in use 0
VG Version 1.0
VG Max Size 508g
VG Max Extents 16256
--- Logical volumes ---
LV Name /dev/vg01/lvol1
LV Status available/syncd
5