
Secure NFS on HP-UX 11i v3


15
VI. Configure the Secure NFS Client
Once the Secure NFS server is configured and filesystems are shared with the desired security modes,
the final step is to configure the NFS clients to mount these filesystems using Secure NFS. This
involves adding the “sec=mode” option to the mount syntax, whether that is the actual manual mount
command, the /etc/fstab entry for filesystems mounted automatically at system boot time or
AutoFS map entries for filesystems managed by AutoFS.
A. Manual mount_nfs(1M) Command Syntax
To enable Secure NFS on filesystems that are manually mounted using the mount(1M) command, the
“sec=mode” option is needed to inform the NFS server which security flavor is desired for the
filesystem. If the “sec=mode” option is not used the NFS client and server will negotiate the security
mode used for the given filesystem.
For example, on my NFS client system “atcux10.rose.hp.com” I am able to mount the shared Secure
NFS filesystem from server “atcux12.rose.hp.com” without specifying the “sec=krb5” option as the
client and server negotiate this security policy. This is shown in Figure 16.
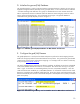
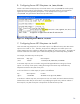
Figure 16 Manual mount(1M) of Secure NFS Filesystem
This example shows the root user on NFS client “atcux10.rose.hp.com” initializing their Kerberos
credentials (kinit), listing out the initial credentials (klist), mounting the shared Secure NFS
filesystem (mount), displaying the newly mounted filesystem attributes and confirming that
Kerberos security is active (nfsstat), and then displaying the revised Kerberos credentials to
confirm the client has successfully cached the NFS service principal for “atcux12.rose.hp.com.”