
ONCplus B.11.31.11 Release Notes (5900-1557, February 2011)
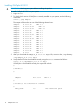
Table Of Contents
- ONCplus B.11.31.11 Release Notes
- Contents
- 1 ONCplus Overview
- 2 ONCplus B.11.31.11
- 3 Known Problems and Workarounds
- 4 Features Introduced in previous versions of ONCplus
- Features Introduced in ONCplus B.11.31.10
- Features Introduced in ONCplus B.11.31.09.02
- Features Introduced in ONCplus B.11.31.09.01
- Features Introduced in ONCplus B.11.31.09
- Features Introduced in ONCplus B.11.31.08
- Features Introduced in ONCplus B.11.31.07.01
- Features Introduced in ONCplus B.11.31.07
- Features Introduced in ONCplus B.11.31.06
- Features Introduced in ONCplus B.11.31.05
- Features Introduced in ONCplus B.11.31.04
- Features Introduced in ONCplus B.11.31.03
- Features Introduced in ONCplus B.11.31.02
- Features Introduced in ONCplus B.11.31.01
- Features Introduced in ONCplus B.11.31_LR
- Software Availability in Native Languages

NOTE: You must specify the full path name of the source depot when you use swlist and
swinstall commands.
5. Run the following command to install the product on a stand-alone system:
swinstall -x autoreboot=true -s \
/tmp/ONCplus_B.11.31.11.depot ONCplus
NOTE: ONCplus includes kernel filesets. As a result, installing the product using the
swinstall command will require the system to be restarted after the installation is complete.
Verifying ONCplus B.11.31.11 Installation
To verify the ONCplus installation:
1. Run the following command to verify the software installation:
swverify ONCplus
If ONCplus B.11.31.11 is successfully installed, the following message is displayed:
Verification succeeded
2. To check which version of ONCplus is installed on your system, issue the following command:
swlist | grep ONCplus
The output will be similar to the following:
ONCplus B.11.31.11 ONC+ 2.3
Installation Information 13