
NFS Services Administrator's Guide (B.11.31.02) January 2008
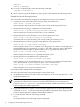
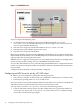
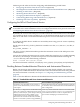

Figure 2-2 WebNFS Session
Figure 2-2 depicts the following steps:
1. An NFS client uses a LOOKUP request with a PUBLIC file handle to access the
foo/index.html file. The NFS client bypasses the portmapper service and contacts the
server on port 2049 (the default port).
2. The NFS server responds with the file handle for the foo/index.html file.
3. The NFS client sends a READ request to the server.
4. The NFS server responds with the data.
Removing the additional overhead of the PORTMAP and MOUNT protocols reduces the binding
time between the client and the server. The WebNFS protocol reduces the number of over-the-wire
requests and makes traversing firewalls easier.
WebNFS offers no support for locking files across mounted filesystems. Hence, multiple clients
cannot synchronize their locking calls across WebNFS mounted filesystems.
To access the shared directory across a firewall using the WebNFS feature, configure the firewall
to allow connections to the port number used by the nfsd daemon. By default the nfsd daemon
uses port 2049.
Configure the firewall based on the port number configured.
Configuring an NFS Server for use by a PC NFS client
PC NFS is a protocol designed to perform the following functions:
• Allow PC users who do not have UNIX style credentials to authenticate to a UNIX account
• Perform print spooling from a PC on to a UNIX server
Once a PC client has successfully authenticated itself on the NFS server, the PC uses the MOUNT
and NFS protocols to mount the filesystem and to read and write to a file.
You may want to create the /etc/pcnfsd.conf file for the following reasons:
• If the PC NFS client software assigns user IDs smaller than 101 or greater than 60002, you
can set the uidrange in the /etc/pcnfsd.conf file to allow access to a different range
of user IDs, as in the following example:
36 Configuring and Administering NFS Services