
Network Information Service (NIS) B.11.31.02 Administrator's Guide

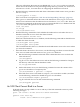
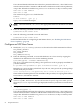

If it is desired that the NIS client has to bind to a particular NIS server, a list of NIS servers
must be constructed first. Continue to add the names of NIS servers in the order of preference,
one per line. When done with the list, press Ctrl+D or the Return key on a line by itself.
next host to add: mammoth
next host to add:
The current list of ypservers looks like this:
mammoth
Is this correct? [y/n: y] y
Type y or n to confirm the output.
NOTE: Ensure that the file /etc/hosts has appropriate entries for the NIS servers added
above.
4. Enter the following command to start the NIS master:
#/sbin/init.d/nis.server start
5. Enter the following command to start the NIS client:
#/sbin/init.d/nis.client start
For detailed information on configuring an NIS Master Server, see “Enabling the NIS Master
Server Capability” (page 24)
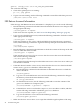
Configure an NIS Slave Server
1. Modify the /etc/rc.config.d/namesvrs file and set the fields mentioned as follows:
NIS_MASTER_SERVER=1
NIS_SLAVE_SERVER=0
NIS_CLIENT=1
NIS_DOMAIN=marketing
2. Enter the following command, to create NIS databases on a slave server by copying the
databases from NIS master server for the marketing domain:
#/usr/sbin/ypinit -s mammoth DOM=marketing
The ypinit procedure starts by asking a few questions in order to properly install NIS in
your environment.
Do you want this procedure to quit on non-fatal errors? [y/n: n] n
Remember to correct anything which fails. If you do not, some part of the system (perhaps
the NIS itself) may not work.
Can the existing directory "/var/yp/marketing" and its contents be destroyed? [y/n: n] y
There will be no further questions. The remainder of the procedure, for copying the databases
from mammoth, will take few minutes.
NOTE: If your master NIS server mammoth, is an HP machine, the NIS databases
ethers.byaddr, and ethers.byname do not exist for you to copy. As a result, you can
ignore any no such map error messages displayed when the systems tries to transfer those
maps.
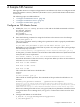
3. Configure NIS slave server as an NIS Client.
# /usr/sbin/ypinit -c
If it is desired that the NIS client has to bind to a particular NIS server, a list of NIS servers
must be constructed first. Continue to add the names of NIS servers in the order of preference,
one per line. When done with the list, press Ctrl+D or the Return key on a line by itself.
next host to add: mammoth
next host to add: ocelot
50 Sample NIS Session