
Network Information Service (NIS) B.11.31.02 Administrator's Guide
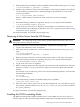
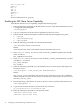
root::0:rootl,sam
other::1:
bin::2:
sys::3:
adm::4:
daemon::5:
mail::6:
lp::7:
For more information, see group (4).
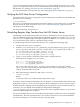
Enabling the NIS Slave Server Capability
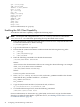
To enable the NIS slave server capability, complete the following steps:
1. Enter the following command on the NIS master server to verify that the NIS master server
is configured and running NIS:
/usr/bin/ypwhich
2. Log in as a superuser to the host that is designated as the slave server.
3. Ensure that the $PATH environment variable includes the following directory paths:
• /var/yp
• /usr/lib/netsvc/yp
• /usr/ccs/bin
4. Enter the following command to set the NIS domain name:
/usr/bin/domainname domainname
Where:
domainname is the same as the domain name on the NIS master server.
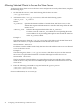
5. In the /etc/rc.config.d/namesvrs file, set the NIS_DOMAIN variable to the domain
name, as follows:
NIS_DOMAIN=domainname
6. In the /etc/rc.config.d/namesvrs file, set the NIS_SLAVE_SERVER and NIS_CLIENT
variables to 1, as follows:
NIS_SLAVE_SERVER=1
NIS_CLIENT=1
7. Enter the following command to set up the NIS slave server and copy the NIS maps from
the master server:
/usr/sbin/ypinit -s NIS_server_name [DOM=domainname]
Where:
NIS_server_name is the name of the master server. If the slave server serves a different
domain from the one set by the domainname command, you must specify the domainname
after NIS_server_name.
8. Run the following command to set up the system as a client to itself and the master sever:
/usr/sbin/ypinit -c
9. Copy the /etc/nsswitch.nis file to /etc/nsswitch.conf, as follows:
cp /etc/nsswitch.nis /etc/nsswitch.conf
10. Enter the following commands to start the NIS scripts:
/sbin/init.d/nis.server start
/sbin/init.d/nis.client start
36 Configuring and Administering an NIS Slave Server