
Installing and Administering OSI Transport Services


Chapter 5 127
Configuring and Verifying HP OTS/9000
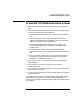
To Add HP OTS/9000 Destination System
To Add HP OTS/9000 Destination System
1. Select “Add” under Destination Systems on the OTS Configuration
menu.
2. Enter the following parameters from your Remote System Worksheet.
(One for each remote node to be configured.)
a. Network Address (NSAP of destination system from the NSAPs
box).
b. Physical Address (If X.25, use the combination of any X.121
address concatenated with the subaddress. If LAN, use the MAC
address from the Subnetwork Address box.)
c. Enter Outgoing Subnetwork Name from line 1 of the Local
Parameter Worksheet for the subnetwork reachable from this
remote system.
d. Enter the type of remote system as either End System (0),
Intermediate System (1), or Both (2) from the General Information
Box.
e. If an X.25 system, enter either Y(es) or N(o) for Accept Reverse
Charging from the X.25 Subnet Information Box. (This field is
disabled if the subnetwork is not X.25.)
3. Press “Perform Task” f4. You will see a pop-up screen displaying
“Task completed...”
4. Press space bar to continue. This returns you to the OTS
Configuration Menu.
5. If this node is an Intermediate System, you may want to add a route
that uses this IS. (Optional)
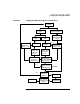
6. Look at the OTS Configuration flowchart to determine the next task
you should perform.
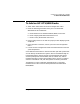
OTS needs this information to communicate with specific peer systems.
Complete this task once for each remote node to be configured. It is
necessary for all directly connected systems except those supporting the
ES-IS protocol.