
Installing and Administering OSI Transport Services


124 Chapter 5
Configuring and Verifying HP OTS/9000
To Add HP OTS/9000 CLNS Over 802.3 or FDDI LAN
To Add HP OTS/9000 CLNS Over 802.3 or
FDDI LAN
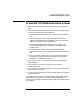
1. Under CLNS over 802.3 or CLNS over FDDI LAN, highlight “Add”
and press “Select Item” or [return]. If you selected 802.3, the CLNS
over 802.3 screen appears. If you selected FDDI, the CLNS over FDDI
screen appears.
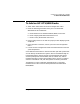
2. Enter the following parameters from your Local Parameter
Worksheet for this subnetwork.
a. Enter the Subnetwork Name from line 1.
b. Enter the Network ID from line 3. (Optional NSAP prefix common
to a group of destination NSAPs.)
c. Enter the Local Network Address (NSAP) from line 2.
d. Enter Device Interface Name from line 7.
e. Enter CLNP Subset from line 8.
3. Press “Perform Task” f4. You will see a pop-up screen displaying “Task
completed....”.
4. Press space bar to continue.
5. Press “Previous Menu” f8 to return to OTS Configuration Menu.
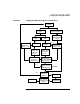
6. Look at the OTS Configuration flowchart to determine the next task
you should perform.
Perform these tasks for each CLNS over 802.3 or FDDI LAN. The line
numbers above refer to those on the worksheet.
The CLNP subset defaults to 3 for NIST compliance. The other nodes on
the network must be at the same subset level. If NULL (0) is selected,
the NSAP has to be the same as the physical address to pass verification
testing.