
HP-UX LAN Administrator's Guide (Feburary 2007)
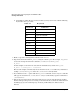

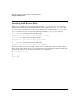
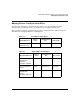
Table Of Contents
- About This Document
- 1 New for the HP-UX 11i v3 Release
- 2 Installing HP-UX LAN
- 3 Configuring HP-UX LAN Using SAM
- 4 Manually Installing and Configuring HP-UX LAN
- 5 Troubleshooting HP-UX LAN
- Troubleshooting Overview
- Troubleshooting Q & A
- LAN Interface Card Statistics
- 100Base-T Checklist
- Diagnostic Flowcharts
- Flowchart 1: Configuration Test
- Flowchart 2: Configuration Test continued
- Flowchart 3: Configuration Test continued
- Flowchart 4: Network Level Loopback Test
- Flowchart 5: Network Level Loopback Test continued
- Flowchart 6: Transport Level Loopback Test (using Internet Services)
- Flowchart 7: Link Level Loopback Test
- Flowchart 8: LAN Connections Test
- Flowchart 9: Gateway Remote Loopback Test
- Flowchart 10: Gateway Remote Loopback Test continued
- Flowchart 11: Subnet Test
- 6 LAN Resources
- 7 Network Addressing
- Overview of Network Addressing Schemes
- Networking Terminology
- Network Addresses and Node Names
- Internet Addresses
- Subnet Addresses
- Configuring Gateways on Fixed-Length Subnets
- Variable-Length Subnet Addressing
- Configuring Gateways on Variable-Length Subnets
- Configuring Gateways on Supernets
- IP Multicast Addresses
- Virtual IP (VIP) Addresses
- CIDR - Classless Inter-Domain Routing
- 8 LAN Device and Interface Terminology

Manually Installing and Configuring HP-UX LANDRAFT COPY
Editing LAN Configuration Files
Chapter 424
Editing LAN Configuration Files
To configure and initialize LAN manually, you must edit the /etc/rc.config.d/netconf file
and execute the HP-UX LAN initialization script. To do so, you must be logged on as root.
The script reads the information in the edited netconf file when the system reboots and
performs the following:
• Configures the network interface with an IP address and optional subnet mask.
• Configures the network routing table if your node is a gateway or on a LAN with a
gateway.
NOTE You must initialize HP-UX LAN to use HP-UX NFS or HP-UX Internet
Services. Refer to “Executing the Network Configuration Script” section below
for options available to make configuration changes active.
You may also want to modify the default station address. To modify the station address, you
must edit the (driver specific) configuration file in the directory /etc/rc.config.d. Refer to
Table 4-2 and Table 4-3 for some examples, and to your specific Ethernet LAN
documentation, as appropriate for your configuration, for complete information.
Modifying the Hewlett-Packard Station Address (optional)
This step is optional and most customers do not need to modify the station address of their
Hewlett-Packard LAN cards.
Modifying the station address of an active card will probably destroy existing connections and
traffic resulting in data loss. Modifying the station address can also cause temporary
confusion in the network because all nodes that were communicating with the local node will
detect an error when using the existing station address. The confusion is temporary and all
nodes may eventually recover from the situation. Problems caused by modifying a station
address during a communication session are difficult to troubleshoot.
Editing the Driver Configuration File in /etc/rc.config.d/
Editing the driver configuration file (refer to Table 4-2 and Table 4-3 for some examples, and
to your specific Ethernet LAN documentation, as appropriate for your configuration, for
complete information) will modify the station address each time the system reboots. The
modified station address is not permanent. Each system reboot causes the preset station
address to be overwritten when a value is supplied to the configuration parameters.