
HP-UX LAN Administrator's Guide (Feburary 2007)
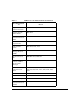


Table Of Contents
- About This Document
- 1 New for the HP-UX 11i v3 Release
- 2 Installing HP-UX LAN
- 3 Configuring HP-UX LAN Using SAM
- 4 Manually Installing and Configuring HP-UX LAN
- 5 Troubleshooting HP-UX LAN
- Troubleshooting Overview
- Troubleshooting Q & A
- LAN Interface Card Statistics
- 100Base-T Checklist
- Diagnostic Flowcharts
- Flowchart 1: Configuration Test
- Flowchart 2: Configuration Test continued
- Flowchart 3: Configuration Test continued
- Flowchart 4: Network Level Loopback Test
- Flowchart 5: Network Level Loopback Test continued
- Flowchart 6: Transport Level Loopback Test (using Internet Services)
- Flowchart 7: Link Level Loopback Test
- Flowchart 8: LAN Connections Test
- Flowchart 9: Gateway Remote Loopback Test
- Flowchart 10: Gateway Remote Loopback Test continued
- Flowchart 11: Subnet Test
- 6 LAN Resources
- 7 Network Addressing
- Overview of Network Addressing Schemes
- Networking Terminology
- Network Addresses and Node Names
- Internet Addresses
- Subnet Addresses
- Configuring Gateways on Fixed-Length Subnets
- Variable-Length Subnet Addressing
- Configuring Gateways on Variable-Length Subnets
- Configuring Gateways on Supernets
- IP Multicast Addresses
- Virtual IP (VIP) Addresses
- CIDR - Classless Inter-Domain Routing
- 8 LAN Device and Interface Terminology

Installing HP-UX LANDRAFT COPY
Loading LAN Software
Chapter 24
Loading LAN Software
Follow the steps below to load the HP-UX LAN software using the HP-UX swinstall
program.
1. Log in as root.
2. Check that /usr/bin, /usr/sbin, and /sbin are in your PATH.
3. Insert the software media into the appropriate drive.
4. Run the swinstall program using the command:
swinstall
This opens the Software Selection Window and Specify Source Window.
5. Change the Source Host Name if necessary, enter the mount point of the drive in the
Source Depot Path field, and activate the OK button to return to the Software Selection
Window. Activate the Help button for more information.
The Software Selection Window now contains a list of available software to install.
6. Highlight the Networking software.
7. Choose Mark for Install from the “Actions” menu to choose the product to be installed.
8. Choose Install from the “Actions” menu to begin product installation and open the
Install Analysis Window.
9. Activate the OK button in the Install Analysis Window when the Status field displays a
Ready message.
10. Activate the Yes button at the Confirmation Window to confirm that you want to install
the software.
View the Install Window to read processing data while the software is being installed,
until the Status field indicates Ready and the Note Window opens.
swinstall loads the fileset, runs the control scripts for the fileset, and builds the kernel.
11. Activate the OK button on the Note Window to reboot the system.
The user interface disappears and the system reboots.
12. When the system reboots, check the swinstall log file in /var/adm/sw to make sure that
the installation was successful.
For additional information on the HP-UX swinstall program, refer to HP-UX 11i Version 2
Installation and Update Guide.