
HP-UX LAN Administrator's Guide (Feburary 2007)


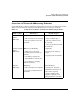

Table Of Contents
- About This Document
- 1 New for the HP-UX 11i v3 Release
- 2 Installing HP-UX LAN
- 3 Configuring HP-UX LAN Using SAM
- 4 Manually Installing and Configuring HP-UX LAN
- 5 Troubleshooting HP-UX LAN
- Troubleshooting Overview
- Troubleshooting Q & A
- LAN Interface Card Statistics
- 100Base-T Checklist
- Diagnostic Flowcharts
- Flowchart 1: Configuration Test
- Flowchart 2: Configuration Test continued
- Flowchart 3: Configuration Test continued
- Flowchart 4: Network Level Loopback Test
- Flowchart 5: Network Level Loopback Test continued
- Flowchart 6: Transport Level Loopback Test (using Internet Services)
- Flowchart 7: Link Level Loopback Test
- Flowchart 8: LAN Connections Test
- Flowchart 9: Gateway Remote Loopback Test
- Flowchart 10: Gateway Remote Loopback Test continued
- Flowchart 11: Subnet Test
- 6 LAN Resources
- 7 Network Addressing
- Overview of Network Addressing Schemes
- Networking Terminology
- Network Addresses and Node Names
- Internet Addresses
- Subnet Addresses
- Configuring Gateways on Fixed-Length Subnets
- Variable-Length Subnet Addressing
- Configuring Gateways on Variable-Length Subnets
- Configuring Gateways on Supernets
- IP Multicast Addresses
- Virtual IP (VIP) Addresses
- CIDR - Classless Inter-Domain Routing
- 8 LAN Device and Interface Terminology

LAN ResourcesDRAFT COPY
Contacting Your HP Representative
Chapter 688
• In the even of a system failure, obtain a full memory dump. If the directory
/var/adm/crash exists, the HP-UX utility /usr/sbin/savecore automatically executes
during reboot to save the memory dump. Hewlett-Packard recommends that you create
the /var/adm/crash directory after successfully installing this product. Send the output
of your system failure memory dump to your HP representative.
• Prepare copies of the /etc/hosts and /etc/rc.config.d/netconf files as well as any
driver specific configuration files that apply.
• Run the verification command, /usr/sbin/swverify, and record the output.
• Execute the display command of the lanadmin diagnostic on the LAN interface and
record the output.
• Record the troubleshooting flowchart number and step number where you are unable to
resolve the problem.
• Save all network log files. Make sure that ERROR and DISASTER log classes are enabled
when log files are collected.
• Execute the following commands and record the output:
netstat -s >> /tmp/filename
netstat -in >>/tmp/filename
netstat -rvn >>/tmp/filename
ndd -get /dev/tcp tcp_status >>/tmp/filename
ndd -get /dev/ip ip_ill_status >>/tmp/filename
ndd -get /dev/ip ip_ipif_status >>/tmp/filename
ndd -get /dev/ip ip_ire_status >>/tmp/filename
ndd -get /dev/ip ip_ill_config_status >> /tmp/filename
ndd -get /dev/arp arp_cache_report >> /tmp/filename
arp -an >>/tmp/filename
lanscan >>/tmp/filename
Or
nwmgr /tmp/filename
what /stand/vmunix >>/tmp/filename
uname -a >>/tmp/filename
Prepare the formatted output and a copy of the log file for your HP representative to further
analyze.