
HP Fabric Clustering System HP-UX Administrator's Guide, March 2008
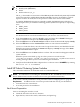
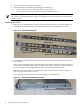
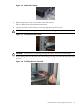
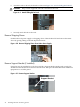

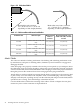
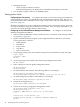
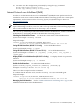


Figure 4-13 Cable Bend Radius
R
R
Bend radius away from a connectorBend radius at the connector
4.6" (11.68 cm) or 5.2" (13.21 cm)
2.3” (5.84 cm) or 2.7” (6.86 cm)
depending on cable length (diameter)
depending on cable length (diameter)
Table 4-1 Cable Installation Minimum Bend Radius
Minimum Bend Radius in the
middle of the cable, with both
ends free
Minimum Bend
Radius at
Connector
Cable DescriptionHP Cable Product
2.3" (5.84 cm)4.6" (11.68 cm)
26AWG Cable OD: 0.345" (8.76
mm)
1m Cable
2.3" (5.84 cm)4.6" (11.68 cm)
26AWG Cable OD: 0.345" (8.76
mm)
5m Cable
2.7" (6.86 cm)5.2" (13.21 cm)
24AWG Cable OD: 0.400" (10.16
mm)
7m Cable
2.7" (6.86 cm)5.2" (13.21 cm)
24AWG Cable OD: 0.400" (10.16
mm)
10m Cable
Attach Cables
The connectors include a latching mechanism. The latching and unlatching mechanism varies
by manufacturer, and prior to installing cables, familiarize yourself with how to engage and
disengage the latch.
If the cable plug is not properly oriented to fit onto the port receptacle (as you attempt to insert
the cable in the port), do not twist the plug to achieve the correct orientation. Instead, reach back
a few feet on the cable, and twist the bulk cable to allow the plug to rotate to the proper orientation.
Doing this prevents the rotational forces from acting right at the plug terminations.
Attach cables to switches and HCAs assuring that the latch is engaged on each connection. Pull
or push evenly across the width of the lanyard to latch or unlatch the plug connector. Pulling
abruptly on the lanyard, or pulling on only one side of the lanyard will prevent the latch/unlatch
operation from occurring, and could damage or break the lanyard.
Care should be taken such that the mounting of the cable to switch or adapter does not place
unnecessary stress on the connection as depicted below:
46 Installing HP Fabric Clustering System