
HP Fabric Clustering System HP-UX Administrator's Guide, March 2008


3. Place the switch on a secure, clean surface.
4. Open the plastic bag containing mounting parts.and locate:
• (12) T-10 Torx screws for attaching the rails to the switch.
• (8) T-25 Torx screws and clips for attaching the rails to the rack.
NOTE: It is highly recommended that two people install the switch, but it can be installed with
one, however it may be difficult to support and align the switch correctly in the rack rails with
only one person.
Installing the Switch
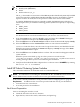
1. Take one set of sliding brackets and separate them. Each side arrives with the sliding rail
assembled to a fixed rail. They need to be separated prior to attaching to the switch.
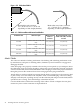
Figure 4-4 Fixed and Sliding Rails
Rails as packaged
Rails separated
Fixed rail to attach to switch
Sliding rail
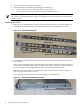
2. To install the switch with the bezel to the front of the rack, install with the flange at the front
of the switch.
You can also mount the flange toward the back if you want to mount the switch backward
in the rack such that the service-side is forward. If the intake for the fans on the switch faces
the hot air output of other equipment, the switch could endure thermal issues.
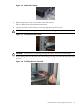
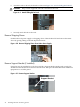
Attach the rail with 6 screws to each side of the switch in the locations shown in Figure 4-5 “
Rail-to-Switch Attachment Locations”
Screw locations are the same in the switch regardless of rail orientation.
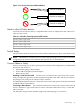
Figure 4-5 Rail-to-Switch Attachment Locations
Attach rail to switch in
Bezel end
the (6) locations highlighted in black.
42 Installing HP Fabric Clustering System