
HP Fabric Clustering System HP-UX Administrator's Guide, March 2008
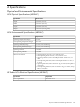


mtu : 2048
auto-negotiate-supported : yes
auto-negotiate : enabled
admin-status : up
oper-status : up
admin-speed : 10gbps
oper-speed : 10gbps
link-trap : enabled
Replacing Individual Components
This chapter describes how to remove and replace the Field Replaceable Units (FRUs) in the
system.
Replacing a Power Supply Module
HP Fabric Switch power supplies are hot-swappable. You have two power supplies installed,
you can remove one of them without removing power from the chassis. Each power supply has
two fans.
The powers supplies are located on the front of the chassis. Power Supply 1 is on the left, from
the front side, on the right from the back side. Power Supply 2 is on the right, from the front side,
on the left from the back side. See figures below.
CAUTION: Never place your hand inside an empty card or module bay.
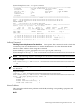
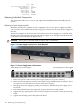
Figure 7-4 Power Supply Location, Front - Bezel Removed
Power Supply 2
Power Supply 1
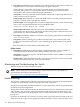
Figure 7-5 Power Supply Power Cord Locations
Power Plug powers Power Supply 2
Power Plug powers Power Supply 1
1. Remove the power cord from the power supply (there are no power switches).
2. Remove the bezel and unscrew the power supply using a Phillips-head screwdriver. These
are captive screws and will not come out of the power supply.
3. Disengage the power supply by pulling it toward you, and slide the power supply out of
the chassis.
4. Insert the replacement power supply into an open slot until it is fully seated.
5. Tighten the two captive panel screws on the front panel to secure the card to the chassis by
hand.
6. Tighten the retaining screws and replace the bezel.
128 Monitoring and Troubleshooting