Using Golden Images with Virtual Partitions Abstract ..............................................................................................2 Installing from Golden Images................................................................3 Creating a Golden Image Archive ..........................................................4 Configuring the Ignite-UX Server to Recognize the Golden Image Archive....6 Enabling the Client ...............................................................................
Abstract This whitepaper describes how to create and use your own Ignite-UX installation archives. Topics include: "Installing from Golden Images" "Creating a Golden Image Archive" "Configuring the Ignite-UX Server to Recognize the Golden Image Archive" "Enabling the Client" "Installing the Golden Image Archive on the Client" A golden image is a snapshot of a known, good operating system installation and configuration that is archived for use in installing other clients.
Installing from Golden Images In addition to supporting the standard operating system installations from a Software Distributor (SD) depot, Ignite-UX supports installing from system images. This method recognizes that many, if not all, clients in a network may be identical (or almost identical) to each other. It is possible to take advantage of this fact by building an archive that contains all of the files you want installed on each of the clients and then using Ignite-UX to install them.
Creating a Golden Image Archive In general, the golden image is simply a system configured with all the software and customizations needed to distribute to a group of clients. The golden image can be saved to media from the golden system and installed on individual systems. Or, the golden image can be stored on another system and installed remotely over the network.
have it save the image to a remote server that enables remote access from this client. Whichever method you choose, you will need to have sufficient disk space to hold the image. The amount of disk space will be approximately one half the amount of data contained on your golden system (assuming a 50% compression ratio). IMPORTANT: Do not use the system while make_sys_image is executing in the next step. Device files are removed, and the host and/or networking information on the system is reset.
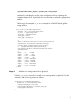
Configuring the Ignite-UX Server to Recognize the Golden Image Archive To create an Ignite-UX configuration file for the golden image archive, use the example file: /opt/ignite/data/examples/ B.11.23.golden_image.cfg Step 1. Create a copy of the example configuration file: cp /opt/ignite/data/examples/ B.11.23.golden_image.cfg \ /var/opt/ignite/data/Rel_B.11.23/golden_image_cfg The destination file name is arbitrary. You can store configuration files anywhere on the system you chose.
/opt/ignite/lbin/archive_impact -t -g archive_file > temp_impacts and then by including the results in the configuration file by replacing the example impacts lines. By default, this assumes that we created a gzipped tar archive. Following is the complete image archive: sw_sel stanza example for a PA-RISC-based golden init sw_sel "B.11.23 PA golden image archive" { description = "B.11.
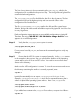
The line of most interest is the one containing the golden_image_cfg, which is the configuration file we added in the previous step. The config and config.local files contain default configurations. The /var/opt/ignite/config.local file should be the last file in the cfg stanza. The last configuration file has the highest priority and can override values in the configuration files listed before it. The file /opt/ignite/data/Rel_B.11.
Enabling the Client Since the Ignite-UX server now knows about the new golden image archive, you can use Ignite-UX to install it onto a client. To do this, you need to get the client to inform the Ignite-UX server that it is ready to install a new operating system. From the console, start by shutting down the virtual partition that you are going to ignite.
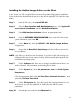
Installing the Golden Image Archive on the Client In this section, we will use Ignite-UX to customize the golden image archive installation. Once the client has booted from the previous step into the Ignite-UX TUI, follow the steps below: Step 1. From the TUI menu, select Install HP-UX. Step 2. From the User Interface and Media Options menu, select Ignite-UX server based installation and then Guided Installation. Step 3. From LAN Interface Selection, choose an appropriate LAN. Step 4.
Step 11. When you have finished entering data, select Go!. Review the data in the configuration dialog box and select Go! again. When the installation process is complete, the client should have the new golden archive installed, a new kernel built, and the virtual partition rebooted and ready for use. © 2005 Hewlett-Packard Development Company, L.P. The information contained herein is subject to change without notice.