
HP-UX HB v13.00 Ch-18 - HPVM

HP-UX Handbook – Rev 13.00 Page 27 (of 49)
Chapter 18 Integrity Virtual Machines (HPVM)
October 29, 2013
Also you can add a virtual DVD associated with the host local DVD.
# hpvmmodify -P vmguest2 -a dvd:scsi::disk:/dev/rdsk/c0t0d0
Once the virtual DVD is associated with the VM, it will automatically identify it when powered.
Note that the VM’s EFI automatically identifies the file system (fsX) on the virtual DVD (media
should be into DVD if using host DVD). Subsequently, the installation media is located on the
virtual DVD (i.e., the ISO image) and the installation boot sequence begins. From this point, the
HP-UX installation is the same as if you are using physical installation media.
Sharing media among virtual machines
Once you have the ISO image on the Integrity VM Host, you may want to use it with multiple
VMs to start the installation process. As before, the virtual DVD must be defined for the new
VM.
# hpvmdevmgmt -l gdev:/hpvm/ISO/B.11.31.iso
/hpvm/ISO/B.11.31.iso:CONFIG=gdev,EXIST=YES,DEVTYPE=FILE,SHARE=NO:…
Among the attributes listed here, note the attribute SHARE is set to NO. By setting this attribute
to YES, multiple VMs may share this ISO image. This is accomplished by executing:
# hpvmdevmgmt -m gdev:/hpvm/ISO/B.11.31.iso:attr:SHARE=YES (ISO)
# hpvmdevmgmt -m gdev:/dev/rdsk/c0t0d0:attr:SHARE=YES (local DVD)
Using Integrity Virtual Machine
This chapter describes the usage of Virtual Machine Software and the commands.
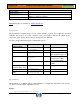
HPVM Commands
hpvmcreate
Create a new virtual machine
hpvmremove
Remove a virtual machine
hpvmstart
Boot a virtual machine
hpvmstop
Stop a virtual machine
hpvmconsole
Connect to the console of a virtual machine
hpvmstatus
Display information about one or more virtual machines
hpvmmodify
Modify the attributes of a virtual machine
hpvmnet
Create and control an Integrity Virtual Machines virtual network
switch (vswitch)
hpvmdevmgtm
Manage the devices that are associated with the VM host and the
guests