
HP-UX HB v13.00 Ch-13 - LVM

HP-UX Handbook – Rev 13.00 Page 59 (of 110)
Chapter 13 LVM
October 29, 2013
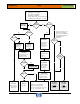
Hot-Swap Procedure
Follow these steps to replace a mirrored hot-swap disk module
1. Unattached the PV
If the PV is still attached and the OLR feature explained above is available then
use pvchange to unattach it:
# pvchange –a N /dev/dsk/c#t#d# Detach all paths to the PV
2. (Optional) Only if PV cannot be unattached reduce the mirrors
Reduce any LVs that have mirror copies on the faulty disk so that they no longer
mirror onto that disk.
NOTE: Be advised to check first, what LVs have mirror extents allocated on the
faulty disk (to be checked with pvdisplay –v /dev/dsk/c#t#d#). Then you should
check for each found LV how it is mirrored (use lvdisplay –v /dev/vg##/lvol#). If
the mirror extents span more than one PV then it is highly recommended to
specifiy all PVs with the lvreduce command that are in the “same mirror set of
disks” as the faulty one. Otherwise LVM may pick the “wrong” disks for reduction,
leading to undesired results (e.g. asymmetrical layouts). Take a note of this PV
list, since you need this information later when you re-establish the mirror using
lvextend.
# lvreduce -m 0 -A n /dev/vg##/lvol# <PV list> for 1 way mirroring, or
# lvreduce -m 1 -A n /dev/vg##/lvol# <PV list> for 2 way mirroring
where list of PVs is the the list of devices determined according to the note
above. We use the –A n option to prevent the lvreduce command from
performing an automatic vgcfgbackup operation, which is likely to get stuck on
accessing a defective disk.
3. Replace the faulty disk
Please refer to the appropriate administration guide for instructions on how to
replace the disk.
Do an ioscan on the replaced disk to insure that it is accessible (CLAIMED) and
also as a double check that it is a proper replacement (see note above).
# ioscan -f /dev/dsk/c#t#d#