
HP-UX HB v13.00 Ch-13 - LVM

HP-UX Handbook – Rev 13.00 Page 54 (of 110)
Chapter 13 LVM
October 29, 2013
2. Generate a map file:
# vgexport -p -s -m /tmp/vgXX.map vgXX
3. Use ftp or rcp to distribute the mapfile (/tmp/vgXX.map) to the other nodes.
On all other nodes where the VG is not activated:
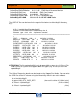
1. Remember the VG minor number:
# ll /dev/vgXX/group
2. If the VG does already exist, export it first and then import it:
# vgexport vgXX
# mknod /dev/vgXX/group c 64 0xXX0000
# vgimport -s -m /tmp/vgXX.map vgXX
NOTE: You may also use the “-f outfile” option of vgexport/vgimport where
outfile contains a list of all devicefiles belonging to the VG. See section
Importing and exporting VGs for details.
3. Backup the LVM configuration:
# vgchange -a r vgXX
# vgcfgbackup vgXX
# vgchange -a n vgXX
See the Serviceguard Chapter for more information.
Replacing a Failed LVM Disk
In order to replace a failed disk you have to recover the original LVM header onto the
new media. The command vgcfgrestore(1M) recovers the backup of the LVM header
from the file system (/etc/lvmconf/vgXX.conf) to the disk. If data was mirrored you can
easily sync it to the new disk. Otherwise you need to figure out which LVs have extents
residing on that disk and recover the data from your backup.