
HP-UX 11i v2 Installation and Update Guide, December 2007


Cold-Installing HP-UX 11i v2 Using Media
Cold-installing HP-UX 11i v2 from Media
Chapter 5 93
Booting Your HP 9000 System
Step 1. Make sure any external devices that need to be configured at cold-install
are connected to the target system and are turned on and operational.
Step 2. Insert the HP-UX 11i v2 DVD into the drive.
Step 3. Stop the autoboot by pressing any key.
The boot console menu is displayed. If you need help, enter: HELP
Step 4. Ensure that Fast Boot is enabled.
1. Select the Configuration Menu: CO
2. If the Fast Boot selection is available, switch Fast Boot ON:
FB ON
3. Return to the Main Menu: MA
(Remember to switch Fast Boot back OFF after installing HP-UX
11i.)
The full memory check that is run when Fast Boot is OFF may take
several hours on a large system.
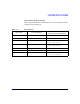
Step 5. Search for bootable devices, using the choices displayed (for example,
enter search or sea). A table similar to this is displayed:
Path# Device Path Device Type
----- ----------- -----------
P0 SCSI HP DVD-ROM
P1 LAN.1.2.3.4.5.6 1.2.3.4
P2 FWSCSI.6.0 IBM DDRS-34560WS
Of the media listed, a fast/wide SCSI device (FWSCSI) is usually a disk,
whereas a single-ended SCSI device (SCSI) can be a disk or CD/DVD
drive.
Step 6. Boot from the DVD drive using the listed path number. For the drive
shown in the previous example (P0), enter: BOOT P0
Step 7. After a few minutes, at the Interact with IPL? prompt press n.
The install kernel loads (3-5 minutes), after which a screen might
prompt you to enter the keyboard language of your console.
Step 8. Enter the number and press
Enter again to confirm.