HP System Management Homepage Installation Guide HP-UX, Linux, and Windows Systems Manufacturing Part Number: 381372-002 May 2005, Edition 2 ©Copyright 2005 Hewlett-Packard
Legal Notices The information in this document is subject to change without notice. Hewlett-Packard makes no warranty of any kind with regard to this manual, including, but not limited to, the implied warranties of merchantability and fitness for a particular purpose. Hewlett-Packard shall not be held liable for errors contained herein or direct, indirect, special, incidental, or consequential damages in connection with the furnishing, performance, or use of this material.
http://docs.hp.com/assistance/feedback.html Revision History Revision Edition 2 May 2005 MPN: 381372-002. The second edition provided installation instructions for the HP-UX Operating Environments. Revision Edition 1 November 2004 MPN: 381372-001. The first edition provided installation instructions for the Linux and Windows operating systems. Typographic Conventions We use the following typographical conventions. audit(5) HP-UX manpage. audit is the name and 5 is the section in the HP-UX Reference.
Table of Contents 1. Product Overview ....................................................................................................... 6 2. Installation Requirements ............................................................................................. 7 Supported Operating Systems .................................................................................. 7 Supported Browsers ................................................................................................
HP System Management Homepage Installation Guide Glossary ..................................................................................................................... 52 Index ..........................................................................................................................
Chapter 1. Product Overview The HP System Management Homepage is a Web-based interface that consolidates and simplifies single system management for HP servers running the HP-UX, Linux, and Microsoft Windows operating systems. The System Management Homepage aggregates and displays data from Web Agents and other HP Web-enabled System Management Software that includes HP Insight Diagnostics, the Array Configuration Utility, and the HP Software Version Control Agents.
Chapter 2.
Installation Requirements ● SUSE Linux Enterprise Server (SLES) 8 with Service Pack 3 or later for AMD64 ● SUSE Linux Enterprise Server (SLES) 9 for x86 ● SUSE Linux Enterprise Server (SLES) 9 for AMD64 and EM64T ● UnitedLinux 1.
Installation Requirements You can use the following desktop browser running on an HP-UX Itanium or PA-RISC system that is connecting to any server type, or a browser running locally on the HP-UX server and displayed to any desktop via X : ● Mozilla 1.6 You can use the following desktop browsers running on a Windows Itanium or x86 system that are connecting to any server type : ● Internet Explorer 6.0 or greater ● Mozilla 1.5 ● Mozilla 1.
Installation Requirements SUSE Linux Enterprise Server (SLES) 9 (x86) ● expat 1.95.7-37 or later ● glibc 2.3.3-98 or later ● pam 0.77-221 or later ● perl 5.8.0 or greater ● zlib 1.2.1 or greater Red Hat Linux Advanced Server 2.1 (x86) ● expat 1.95.1-7 or greater ● glibc v2.2.4 ● pam 0.75-46.7.3 or greater ● perl 5.6.1 or greater ● zlib 1.1.4-8 or greater Red Hat Enterprise Linux 3 (x86) ● expat 1.95.5-6 or greater ● glibc v2.3.2 ● pam 0.75-51 or greater ● perl 5.8.0 or greater ● zlib 1.1.4-8.
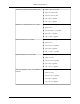
Installation Requirements RPMs Supported on the AMD64 and EM64T Platform The System Management Homepage supports the following RPMs for each of the Linux operating systems on the AMD64 and EM64T platform. Operating System RPM SUSE Linux Enterprise Server (SLES) 8 (AMD64) ● expat 1.95.4-67 or greater ● glibc 2.2.5 ● pam 0.76-74 or greater ● perl 5.8.0 or greater ● zlib 1.1.4-124 or greater SUSE Linux Enterprise Server (SLES) 9 (AMD64 ● expat 1.95.7-37 or greater and EM64T) ● glibc 2.3.
Installation Requirements Red Hat Linux Advanced Server 2.1 (IPF) ● expat 1.95.1-7 or greater ● glibc v2.2.4 ● iproute ● jrockit-j2se 8.1.1.1-2 or greater (IPF only) ● pam 0.75-46.7.3 or greater ● perl 5.6.1 or greater ● ucd-snmp 4.2.4 or greater ● zlib 1.1.4-8 or greater Red Hat Enterprise Linux 3 (IPF) ● expat 1.95.5-6 or greater ● glibc v2.3.2 ● jrockit-j2se 8.1.1.1-2 or greater (IPF only) ● net-snmp 5.0.9 or greater ● net-snmp-perl 5.0.9 or greater ● openssl 0.9.7a-22.1 or greater ● pam 0.
Installation Requirements Note: The AMD64 is an AMD Opteron Processor. The EM64T is an Intel Xeon Processor with Extended Memory 64 Technology. The x86 is an Intel Pentium III/IV/Xeon 32 bit Processor (IA32). The IPF is an Intel Itanium 64 bit Processor (IA64). Verifying System Requirements Before installation begins, the installation utility verifies whether: ● HP-UX/Linux/Windows: The operating system meets the minimum requirements.
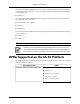
Installation Requirements ● To download the latest software versions, go to the HP Web site at http://www.hp.com. ● For HP-UX, you can also find the software on the Software Depot home at http://www.hp.com/go/softwaredepot. ● For Linux and Windows, the System Management Homepage is available in the ProLiant Support Pack and Integrity Support Pack. To download the latest version of the ProLiant Support Pack or Integrity Support Pack, go to the Support & Drivers page at http://www.hp.com/support/files.
Chapter 3. Initial Setup You can install the System Management Homepage on systems running HP-UX, Linux, and Windows. Additionally, you can install the System Management Homepage in-place using the Windows ProLiant Support Pack or the Linux RPM (Red Hat Package Manager), or remotely with optional preconfiguration using the ProLiant Remote Deployment Utility or the Linux Deployment Utility.
Chapter 4.
Installing on HP-UX Installing System Management Homepage and Dependent Applications There are several applications that System Management Homepage requires and some that are optional. You may already have these applications installed on your system.
Installing on HP-UX Product Bundle Tag Path Status Release OpenSSL OpenSSL /opt/openssl Required HP-UX 11i V1 and V2 If you do not have these applications on your system, you can use the following resources to install them before or after you instal System Management Homepage: ● If you installed or updated HP-UX 11i V1 (B.11.11) from the AR media or HP-UX 11i V2 (B.11.23) from the AR or OE media, then the applications were default installed.
Installing on HP-UX 2. To determine which products and versions are on your system, use the swlist command: /usr/sbin/swlist -l product 3. Use swinstall to install software from the Application DVD. The following example uses swinstall to install software from the source mounted at /cdrom: /usr/sbin/swinstall -s /cdrom bundlename Refer to the swinstall(1M) manpage for details. 4. Select and install software from the Application DVD.
Installing on HP-UX Tip: After the installation is complete, you can start using the System Management Homepage immediately. Configuring System Management Homepage The HP-UX System Management Homepage configuration is based on environment variables that are set by /opt/hpsmh/lbin/envvars and /opt/hpsmh/conf/timeout.conf scripts. To change the default configuration, you can modify the scripts to properly set the value of the following variables.
Installing on HP-UX You can start System Management Homepage by using a Web browser and navigating to http://hostname:2301/. If autostart is configured as the default, there is a daemon listening on http://hostname:2301 only (nothing is listening on port 2381 so that port will fail). When it contacts port 2301 (http), then the HP-UX Apache-based Web Server is started on port 2381 (https) and the page is automatically redirected.
Installing on HP-UX After changing the autostart mode to "on boot" (with the smhstartcommand -b on -a off command), without rebooting you can start the HP-UX Apache-based Web Server processes with the /opt/hpsmh/lbin/hpsmh start command. Patching or Updating the Software HP may issue patches to the System Management Homepage. If this is the case, you can adopt a proactive patch management strategy and regularly check the standard patch resources: ● IT Resource Center (ITRC) at http://itrc.hp.
Chapter 5. Installing on Windows This chapter provides steps to install System Management Homepage on the Windows operating system.
Installing on Windows ● Select Local Access Anonymous or Local Access Administrator to set up the System Management Homepage to automatically grant local IP addresses at the selected access level. Caution: Selecting Local Access with Administrator privileges provides any users with access to the local console full access without prompting them for a user name or password. 6. Click Next. The Trust Mode dialog box appears. 7.
Installing on Windows Note: To delete a certificate, select the certificate and click Delete. The selected certificate is removed. ● Trust By Name a. Select Trust By Name. b. Click Next. The Trusted Server dialog box appears. Note: Although the Trust By Name mode is a slightly stronger method of security than the Trust All mode, it still leaves your system vulnerable to security attacks.
Installing on Windows a. Enter the Subnet IP Address in the designated field. b. Enter the NetMask in the designated field. c. Click Add, and the Subnet IP Address/NetMask is displayed in the dialog box. To delete a Subnet IP Address/Netmask from the dialog box, select a Subnet IP Address/NetMask, and click Delete. The Subnet IP Address/Netmask is removed from the dialog box. Note: You can add up to five Subnet IP Address/NetMask pairs. 9. Click Next. The IP Restricted Logins dialog box appears.
Installing on Windows Note: If Next is selected without adding any IP addresses to either theInclude or Exclude lists, a warning message appears stating, IP Restricted Login checkbox will be marked as disabled. Do you want to proceed without adding any IP Address restrictions? If you select OK, the IP Restricted Login option on the IP Restricted Login dialog box is deselected, and the Install Preview dialog box appears. 12. Click Next. The Install Preview Panel appears.
Installing on Windows Reinstalling silently using the CLI To reinstall silently using the CLI: setup.exe /s /reinst /f1 Note: The /s /reinst command reinstalls the same version of System Management Homepage. The /s /preserve command preserves the existing hpsmh.xml settings. If you are performing an initial installation of System Management Homepage 2.x, the /preserve command preserves the pre-2.x settings if present in the compaq\wbem directory.
Chapter 6. Using the ProLiant Remote Deployment Utility This chapter provides steps to install System Management Homepage on the Windows operating system using the ProLiant Remote Deployment Utility. ● “Installing Remotely on Windows Using ProLiant Remote Deployment Utility” (page 29) The previous chapter provides steps to install System Management Homepage in-place on the Windows operating system.
Using the ProLiant Remote Deployment Utility 3. To add System Management Homepage groups: 1. In the Group Name field, enter a name for the group. For example, you might want to use vcAdmin for a Version Control Administrator group. Note: It is necessary to assign an account to an operating system user group with administrator privileges to access the Version Control Repository Manager from the Version Control Agent.
Using the ProLiant Remote Deployment Utility Click OK to select another file, or click Cancel to close the dialog box. The Trusted Certificate List appears. Note: If you click Next without adding any certificates to the list, and no certificates exist from a previous installation, a message appears indicating that if you do not specify any trusted certificates, HP Systems Insight Manager cannot access the HP Insight Management Agents on this system.
Using the ProLiant Remote Deployment Utility ● Trust All a. Select Trust All. b. Click Next. The IP Binding dialog box appears. Note: The Trust All option leaves your system vulnerable to security attacks and sets up the System Management Homepage to accept certain requests from any server. For example, you might want to use Trust All if you have a secure network, and everyone in the network is trusted. 8. Select IP Binding to enable the Subnet IP Address and NetMask.
Chapter 7. Installing In-Place on Linux This chapter provides steps to install System Management Homepage in-place on Linux IA-32 systems and x86-64 systems.
Installing In-Place on Linux To install System Management Homepage, enter the following command line: rpm –ivh hpsmh-2.0.0-linux.i386.rpm A message appears indicating the System Management Homepage installed successfully with default configuration values. Installing System Management Homepage on x86_64 To install System Management Homepage on x86_64 systems, your system must meet the minimum requirements. For more information regarding minimum requirements, refer to Chapter 2.
Installing In-Place on Linux The Welcome screen appears. 2. The Welcome screen indicates that you can configure security and access parameters on the following screens. Press Enter. The Operating System Groups screen appears. 3. The Operating System Groups screen enables you to add operating system groups to System Management Homepage. The following options are available: ● 1 - Add Groups To add groups: 1. At the prompt, enter 1 to add a group.
Installing In-Place on Linux ❍ Enter 3 for User. The User Group List is displayed. 2. At the prompt, enter 1, 2, or 3. 3. Enter the number next to the group name to be deleted. The group is deleted from the group list. Note: You can delete as many groups as needed by repeating the applicable step below. 4. 4. Press Enter when you are finished deleting to go to the next screen. 5. Enter n to go to the next screen. The Operating System Groups screen is displayed. 6.
Installing In-Place on Linux The following options are available: ❑ 1 - Add File To add a certificate file: 1. Enter 1. You are prompted for the certificate location. 2. Enter the file path of the trusted certificates to be added to the Trusted Certificates List. Press Enter when you are finished. For example: 1. File: /home/ServerName/cert1.pem . 2. Press Enter. The cert1.pem is added to the Trusted Certificates List.
Installing In-Place on Linux 4. Press Enter when you are finished deleting certificate files. ❍ 2 - Trust by Name 1. Enter 2 to Trust by Name. Trust Mode: Trust by Name is displayed. 2. Enter 4 to Modify Server Name list. To add an HP Systems Insight Manager server name: a. Enter 1. You are prompted to add an HP Systems Insight Manager server. b. Enter the name of the HP Systems Insight Manager server to be trusted and press Enter. The server name is displayed in the Trusted Server Names list.
Installing In-Place on Linux 2. Enter the IP address to be added. IP Address: YourIPAddress is displayed. You are prompted for the netmask. 3. Enter the netmask. netmask: YourNetmask is displayed. Note: You can add or delete as many IP addresses as you want. To delete an IP address: 4. a. Enter 2. b. Enter the number of the IP address or netmask ask to be deleted. The IP address or netmask is removed from the IP address or netmask list. Enter n to go to the next screen.
Installing In-Place on Linux d. i. Enter 2. ii. Enter the number associated with the IP address or IP address range to be deleted and press Enter. The IP address or IP address range is deleted from the Inclusion List. Enter n for next. ● Enter 2 to disable IP Restricted Logins, which sets it to OFF. IP Restricted Logins: OFF is displayed. To disable IP Restricted Logins: • Enter 2 to disable the IP Restricted Logins. The IP Restricted Logins is set to OFF.
Chapter 8. Installing In-Place on Linux Using Linux Deployment Utility This chapter provides steps to install System Management Homepage in-place on the Linux operating system using the Linux Deployment Utility.
Installing In-Place on Linux Using Linux Deployment Utility To pre-configure the System Management Homepage component: 1. Run the install720.sh script. The HP ProLiant Linux Deployment Utility screen is displayed asking you to wait while component XML files are parsed. 2. Under Component Name, select HP System Management Homepage for Linux. 3. Right-click HP System Management Homepage for Linux and select Configure Component. The Configuration Option screen is displayed. 4.
Installing In-Place on Linux Using Linux Deployment Utility 13. In the Enable IP restricted logins field, enter YES to enable IP restricted logins or NO to disable IP restricted logins. 14. In the IP Binding List field, enter the IP address and netmask pairs separated by semicolons. For exmaple, IPAddress1/Netmask1;IPAddress2/Netmask2. 15. In the Enable IP restricted logins field, enter YES to enable IP restricted logins or NO to disable IP restricted logins. 16.
Chapter 9. Initializing the Software for the First Time This chapter provides an overview of how to initialize the System Management Homepage. After the System Management Homepage has been installed and configured for the first time, a process to create a private key and corresponding self-signed base64 encoded certificate is initiated. This certificate is a base64-encoded PEM file.
Chapter 10. Logging In and Logging Out of System Management Homepage This chapter provides browser and command line instructions for logging in to System Management Homepage and for logging out.
Logging In and Logging Out of System Management Homepage 2. Select the Security tab. The Security tab appears. 3. Select the Trusted sites icon. 4. Click Sites.... The Trusted sites dialog box appears. 5. In the Add this Web site to the zone field, enter https://hostname:2381/ and click Add. 6. Click OK to save your changes and close the Trusted sites dialog box. 7. Click OK to close the Internet Options dialog box.
Logging In and Logging Out of System Management Homepage 5. Enter the password that is recognized by the operating system. 6. On HP-UX, click Sign In. On Linux and Windows, click Login. The System Management Homepage appears. Logging In with Mozilla To log in to the System Management Homepage with Mozilla: 1. Navigate to http://hostname:2381/.
Logging In and Logging Out of System Management Homepage Logging In from the HP-UX Command Line You can check whether the autostart daemon is running with the command: $ ps -ef | grep smh root 1789 1 0 Mar 31 ? 0:00 /opt/hpsmh/lbin/smhstartd If the daemon is not running, you can start it from the HP-UX command line using /opt/hpsmh/lbin/hpsmh autostart, then use a Web browser to navigate to http://hostname:2381.
Chapter 11. Uninstalling the System Management Homepage This chapter provides instructions on how to uninstall System Management Homepage from HP-UX, Linux, and Windows systems. It also provides instruction on how to uinstall it manually.
Uninstalling the System Management Homepage must use your existing setup.iss file or you must generate one before proceeding with the silent uninstall. To uninstall silently using the CLI: setup.exe /s /removeonly /f1 Uninstalling Manually for Windows Systems Uninstalling manually duplicates the actions of the System Management Homepage uninstaller, which can be accessed through Add/Remove Programs in the Control Panel.
Uninstalling the System Management Homepage 3. a. If the HP Version Control Agent and/or the HP Version Control Repository Manager is installed on the system, remove all files and directories under \hp\hpsmh\bin except libeay32.dll and ssleay32.dll. b. If the Version Control Agent, Version Control Repository Manager, or both are not installed on the system, remove the entire \hp\hpsmh\bin directory.
Glossary caution A note to indicate that failure to follow directions could result in damage to equipment or loss of information. certificate An electronic document that contains a subject's public key and identifying information about the subject. The certificate is signed by a Certification Authority (CA) to bind the key and subject identification together.
Glossary The HP Version Control Agent can be configured to point to a HP Version Control Repository Manager, allowing easy version comparison and software update from the repository. HP Version Control Repository Manager An Insight Management Agent that allows a customer to manage HP-provided software stored in a user-defined directory/repository. HP Web-enabled System Management Software Software that manages HP Web-enabled products.
Glossary one system to another, and it provides authentication and secure communications over insecure channels. Secure Sockets Layer A standard protocol layer that lies between HTTP and TCP and provides privacy and message integrity between a client and server. A common use of SSL is to provide authentication of the server, so the client can be assured it is communicating with the system that the system claims to be. It is application protocol independent.
Glossary version control A feature that checks the versions of HP operating system drivers, HP Systems Insight Manager Agents, HP utilities, and firmware on the user's system. It compares them with the Version Control Database (VCDB) of current software and firmware versions. Version control then indicates that the software is up to date or that an upgrade is available and provides reasons for upgrading. Version information appears as a system link for a system.
Index C console install Linux, 33 conventions, typographic, 3 copyright notices, 2 G getting started, 15 government license, 2 H HP-UX install, 16 I initial setup, 15 initialize software, 44 install HP-UX, 16 Linux, 41 Linux IA_32, 33 Linux x86_64, 33 operating systems, 7 ProLiant Remote Deployment Utility, 29 requirements, 7 RPMs on AMD64 and EM64T, 11 RPMs on IA-32, 9 RPMs on Itanium, 11 verify requirements, 13 web browsers, 8 Windows, 23, 29 Itanium RPMs, 11 L legal notices, 2 Linux install, 33 Linux
Index verify install requirements, 13 web browsers, 8 web sites, 13 Windows install, 23, 29 T trademark notices, 2 typographic conventions, 3 U uninstalling, 49 W warranty, 2 web browsers supported, 8 web sites System Management Homepage, 13 Windows install, 23 install ProLiant Remote Deployment Utility, 29 57