
Supervising the Network


2-74
Setting Up and Managing NetWare Directory Services Objects
Changing Object Property Values
Do not choose “Cancel” unless you want to lose all changes made to every page
of the “Object” dialog box.
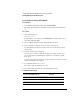
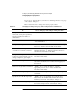
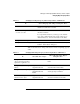
Table 2-6 describes how to change User object property values.
Table 2-6 Changing User Object Property Values Using NetWare Administrator
To Choose this page of the “Object” dialog box; then…
Change the user’s last name, other
names, title, description, department,
telephone number, fax number, or
email address
“Details”; enter information in the fields.
Disable the user’s account “Details”; choose “Login Restrictions” and select (check)
“Account Disabled.”
Change the user’s password “Details”; choose “Password Restrictions,” choose “Change
Password,” and then enter information in the fields.
Set the user’s account expiration date
or number of concurrent connections
“Details”; choose “Login Restrictions,” check “Account
Has Expiration Date” or “Limit Concurrent Connections,”
and then enter information in the fields.
Change the user’s password
restrictions (password length, periodic
changes, uniqueness, grace logins)
“Details”; choose “Password Restrictions” and enter
information in the fields.
Restrict the user’s login times “Details;” choose “Login Time Restrictions” and choose the
days and hours that the user is restricted from logging in to
the network.
Set the user’s login address restrictions “Details”; choose “Network Address,” select the
appropriate protocol, choose “Add,” and then enter
information in the fields.
Change the user’s login script “Details”; choose “Login Script” and enter login script
commands.
Specify the user’s Profile login script “Details”; choose “Login Script,” choose the browser
button next to the “Profile” field, and then select a new
Profile object from the “Select Object” dialog box.
Add the user to an existing Group “Details”; choose “Group Membership,” choose “Add,” and
then select a Group from the “Select Object” dialog.