
NetWare Client for DOS and MS Windows User Guide

3-14
Understanding Client Tools
Using NetWare User Tools for MS Windows
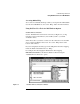
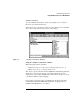
Using the “NetWare Drive Connections” Window
When using this window, remember
• Before using “NetWare Drive Connections,” you must first log in to a Directory
Services tree or server that contains the object you want to connect to.
• NetWare User Tools for MS Windows recognizes all drive mappings that existed
before MS Windows was started.
However, when you are using a DOS Box inside MS Windows, your previous
search drives are disabled unless the “Global Drives & Paths” box is checked in
the “NetWare Setting” window.
• NetWare User Tools supports universal naming conventions (UNC) redirection
for network volumes and directories. See “Using Universal Naming Convention
(UNC) Paths in MS Windows.”
• The “Permanent” button allows you to specify a drive to reconnect at the startup
of MS Windows.
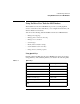
Viewing the “Resources” List
This list within the “NetWare Drive Connections” window contains the
following:
• Volumes
• Directories
• NetWare Directory Services objects
• NetWare Directory Services containers
The volumes and directories are listed in a hierarchical structure. Choose the
“Volume” icon in the “Resources” list to display subdirectories.
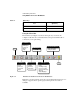
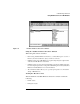
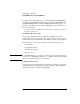
NetWare Printer Connections
Use this window (see Figure 3-4) to capture network print queues to your
client printing ports.
Select the resource you want to connect to in the “Resources” list, and then
choose a client workstation port. Now, choose the “Capture” button at the
bottom of the window.
If you are using keyboard entry, type in the full queue name for the port
capture inside the “Queue” field and then choose “Capture.”