
NetWare 4.1/9000 Print Services


2-56
Managing Print Services with the NetWare Administrator Utility
Working with Printer Forms
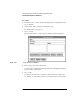
The “Mount Form” window appears. A list of existing forms appears in the
“Defined Forms” field.
4 Select the form you want to mount.
The form number appears in the box below.
5 Select “OK.”
You can also mount printer forms from PCONSOLE or at the print server
console. See “Mounting Printer Forms” in Chapter 4 (PCONSOLE) or
“Viewing a List of Forms” in Chapter 9 (PSERVER).
Viewing or Modifying Printer Forms
Procedure
1 From the browser’s “Object” menu, select a container object and then choose
“Details.”
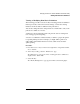
2 At the “Object” dialog, press the “Printer Forms” page.
The “Printer Forms” page appears, listing all current forms in that container.
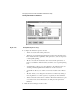
3 Highlight the form you wish to modify and select “Modify.”
The “Modify Printer Form” dialog appears. The values for the printer form that
you selected appear in the fields of the dialog. You can change any of the fields.
4 (Optional) Enter a new name in the “Name” field.
The name must begin with a letter, and must be unique. It can be up to 8
characters long. Spaces are converted to underscores (_).
5 (Optional) Enter a number from 0 to 255 in the “Number” field.
6 (Optional) Enter a number from 1 to 255 in the “Length” field.
This is the length of the printer form you are redefining, measured in lines of
text.
7 (Optional) Enter a number from 1 to 999 in the “Width”field.
This is the width of the printer form, measured in characters.
8 Choose “OK.”
The form is now modified. You do not have to choose “OK” in the object dialog
to complete the action.