
NetWare 4.1/9000 Print Services


2-52
Managing Print Services with the NetWare Administrator Utility
Working with Print Job Configurations
“Enable timeout” to enter a value here. Timeout can range from 1 to 1000
seconds.
4 Choose “OK.”
NOTE: The NET.CFG file now includes a network “PRINTERS=number” option that you
may specify if you choose. This option allows you to specify the number of logical
ports (0-9) you would like to be able to capture. The default is 3.
If you specify a print job configuration that has a complex printer mode, you may
need to increase the bytes (default 64, range 0 to 255) in the “PRINTER
HEADER=number” option.
See Appendix B, “NET.CFG Options,” in NetWare Workstation for DOS and
Chapter 8, “Creating and Managing Print Job Configurations” for more information.
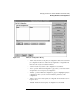
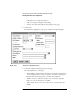
Viewing or Modifying Print Job Configurations
The “Print Job Configuration” page lists the names of different print job
configurations you can use. You can add new job configurations or modify
the parameters of existing configurations.
Procedure
1 Choose the “Print Job Configuration” page of a user “Organization” or
“Organizational Unit” dialog.
The “Print Job Configuration” page appears.
2 Select the name of the print job configuration you wish to modify and choose
“Modify.”
The “Print Job Configuration” dialog appears.
3 Follow the procedures described in the previous section, “Creating Print Job
Configurations,” starting at Step 3.
4 To delete a configuration, choose the “Delete” option.
Selecting a Default Print Job Configuration
You can select a default print job configuration from the “Print Job
Configuration” page to have your most frequently used print job
configuration automatically used in CAPTURE and NPRINT.