
NetWare 4.1/9000 Print Services


2-20
Managing Print Services with the NetWare Administrator Utility
Setting Up Print Services with NetWare Administrator
You are returned to the “Printer” dialog.
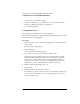
6 Select the “Configuration” page and make any necessary changes, including
parameters available after selecting “Communication.”
See “Configuring Printers.”
Creating Print Servers
The following procedure lets you create a print server.
You must have a print server, along with a printer and a print queue, in order
for network users to share printers.
Procedure
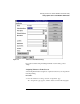
1 From the browser’s “Object” menu for the Organization or Organizational unit,
select “Create.”
The “New Object” dialog appears.
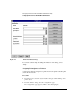
2 Select “Print Server.”
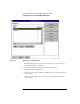
The “Create Print Server” dialog appears.
3 Type a name of your choice in the “Print Server Name” field.
Not all print server names will be valid Service Advertising Protocol (SAP)
names. For example, SAP names may not exceed 47 characters, they cannot
contain spaces, and they must be in all-caps. In addition, many double-byte
characters used on certain code pages are not valid SAP characters. For more
information, see “Service Advertising Protocol (SAP)” in Concepts.
4 Mark the “Define Additional Properties” box.
5 Select “Create.”
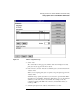
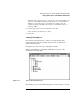
6 Enter information in the “Print Server” dialog.
The “Print Server” dialog for the print server you created appears, similar to the
one shown here. The information you enter can later help you search for and
manage network resources.