
NetWare 4.1/9000 Print Services


9-3
Using NETUSER and PSC
Using NETUSER
Printing Tasks Handled through NETUSER
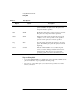
Table 9-1 NETUSER Tasks
To perform the following task Do the following
Capture a printer
1 At the NETUSER “Available Options” menu, choose an LPT
port under “Printing.” (Press <F4> to toggle between
NetWare® Directory Services™ and bindery modes.)
2 Select “Change Printers”; then choose a printer or print queue
from the “Printers/Print Queues” menu.
Print a job
1 At the NETUSER “Available Options” menu, select a port that
has been redirected to a network printer or print queue under
“Printing.”
2 Select the “Print Jobs” option. Press <Insert> and follow the
instructions in the information lines.
3 When you are finished with the screen “New Print Job to be
Submitted,” press <F10> or <Esc> and choose “Yes” to save
changes and print.
Attach to a NetWare server
1 At the NETUSER “Available Options” menu, select
“Attachments”; then press <Alt>+<F1> to display more
options at the bottom of the screen.
2 Press <Insert> to display a list of available servers.
3 Press <F1> for help from here.