
NetWare 4.1/9000 Print Services

7-8
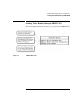
Creating and Managing Print Job Configurations
Working with Print Job Configurations
Form feed Type “Y” for “Yes” or “N” for “No.”
Choose “Yes” if you want the printer to advance to the top of the next page
after your print job.
Choose “No” if you do not want the printer to advance to the top of the next
page. Some applications already have a form feed at the end of the file, so
setting this parameter can cause an extra blank page to be fed through.
Default: Yes
Notify when done Type “Y” for “Yes” or “N” for “No.” If you choose “Yes,” you are notified
that your data has been printed. A message appears across the bottom of
your screen.
Default: No notification
Form name Specifies the form that the printer will use. If an invalid form name is used,
CAPTURE will use the default value, “(None).” (You must define forms
using PRINTDEF or NetWare Administrator before users can use form
names or numbers.) With an invalid name or number, CAPTURE gives a
warning message but still redirects the port using default form values.
Default is None.
Print banner Type “Y” for “Yes” or “N” for “No.” Choose “Yes” if you want a banner to
be printed before the file is printed.
Default: Yes
Name If you print a banner, you can specify the username that appears on the
upper part of the banner page. You can use the default username, or you can
type any text (up to 12 characters long).
Default: Your username
Banner name Indicates what will appear in the lower half of the banner page. Limit is 12
characters. Use any word or phrase up to 12 characters long. To allow
spaces in a banner name, enclose the name in quotation marks (for
example, “ON THE GO”)
Default: The captured port (for example, LPT1) or, when using NPRINT,
the filename.
Table 7-1 PRINTCON Configuration Parameters
Parameter Explanation