
NetWare 4.1/9000 Print Services


7-5
Creating and Managing Print Job Configurations
Working with Print Job Configurations
Creating Bindery Print Job Configurations
Procedure
1 Load PRINTCON and press <F4> to switch to bindery mode.
You may receive a warning message at this point telling you that you must have
a SYS:MAIL directory before you can create a private bindery print job
database. To do this you must log into this server in bindery mode.
If you are not attached to a bindery server, a list of servers you are already
attached to is displayed.
a Press <Insert> and browse through the “Other NetWare Servers” list until you
select the bindery server you want to attach to.
b Log in to the bindery server you selected by entering your username and
password at the prompts.
You then return to the list of attached servers, which now includes the
bindery server you logged in to.
c Select the bindery server to make it the current server.
You are returned to the “Available Options” menu.
2 Select the “Edit print job configurations” option.
The “Print Job Configurations” list appears.
3 At the “Print Job Configurations” list, press <Insert> to create a new
configuration.
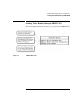
If you are logged in to the bindery server as a Supervisor or equivalent user, the
options of “Private Database” or “Public Database” will appear. Print jobs
created for the private database are stored in the users MAIL directory, and
public database jobs are stored in SYS:PUBLIC directory.
When a user goes into PRINTCON to edit print jobs, all job configurations from
both the user’s print job database (in the MAIL directory) and those in the
PUBLIC database are shown. If the job configuration is a public job, it will have
“(Public)” listed next to the configuration name.
Here are some additional points to keep in mind:
• Bindery-based users will have access only to print job configurations created by
a bindery based user.
• Directory Services based users will have access only to print job configurations