
NetWare 4.1/9000 Print Services

3-8
Managing Print Services with PCONSOLE
Modifying NetWare Print Services
The “Printers” list box appears.
a To add a printer, press <Insert>.
b To delete a printer, press <Del>.
c To change a name, highlight the name then press <F3>.
d To (re)configure a printer, select the desired printer name.
The fields most likely to need changes are “Printer Type,” “Configuration,”
and “Print Queues Assigned.”
For new printers to work, all three of these fields must be properly set up.
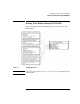
2 Select the printer to be configured.
The “Printer Configuration” window appears.
3 Select “Printer Type”; then select the type of printer you are using.
4 Select “Configuration.”
The window for the printer type you selected appears.
5 Complete the configuration fields on the screen.
See “Configuring Printers” for a table explaining each of these fields.
6 Press <Esc> and select “Yes” to save your changes.
7 To assign a new printer, use PCONSOLE to associate it to a print server
a Select the “Print Servers” option on PCONSOLE's main screen.
b Select the desired print server name.
c Select “Printers”; then press <Insert> and browse to the desired printer.
If the desired printer has not yet been created, press <Insert> to create a new
printer.
Creating or Modifying Print Servers
This section describes the procedure when using PCONSOLE.
Procedure
1 From PCONSOLE's main menu, select “Print Servers.”