
HP-UX TN3270 Users Guide, March 1998

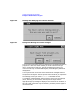
Table Of Contents
- Audience
- Fast Path to TN3270 Emulation and File Transfer
- Organization of This Guide
- Typographic Conventions
- Motif Version and Character-Based Version
- Help Screens
- HP-UX SNAplus2 TN3270 Documentation Set
- Related Publications
- 1 Introducing the TN3270 Emulation Program
- Overview
- Support of TN3270 Features
- Sessions
- Model 2-5 Display Support
- File Transfer
- Background Operation
- Temporary Exit from TN3270 Emulation
- Type-Ahead during TN3270 Emulation
- Local Copy
- Keyboard Remapping
- Keystroke Recording and Replay
- International Language Support
- 3270 Status Line
- Printer Emulation
- File, Customize, and Control Menus
- HLLAPI Support
- Where Do You Go from Here?
- Overview
- 2 The TN3270 Emulation Program User Interface
- 3 Getting Started with 3270 Emulation
- Overview
- Specifying the Path to TN3270 Product Programs
- Fast Path to 3270 Terminal Emulation
- Starting the TN3270 Emulation Program
- Using Menus and Dialog Boxes
- Running 3270 Emulation in the Background
- Overview of 3270 Operations
- 3270 Data Fields
- Double-Byte Characters
- Keystroke Recording and Replay
- Running HLLAPI Programs
- Moving from the Menu Interface to TN3270 Emulation
- Exiting the TN3270 Emulation Program
- Automating the TN3270 Emulation Start-Up
- Where Do You Go from Here?
- 4 Controlling 3270 Emulation
- 5 Transferring Files
- Overview
- Fast Path to File Transfer
- Preparing to Transfer Files
- Monitoring File Transfer Status
- Transferring Files Using the Menu Interface
- Transferring Files from the HP-UX Command Prompt
- Stopping a File Transfer in Progress
- Finishing File Transfer
- 6 Customizing 3270 Emulation
- 7 Solving Problems
- Overview
- 3270 Could Not Initialize due to Failure to Fork a...
- 3270 Emulation Program Not Found
- Cannot Get from 3270 Session to TN3270 Emulation P...
- Cannot Run 3270 Emulation in Background
- Cannot Run 3270 Emulation without a Menu Interface
- Cannot Tell Which Terminal Keys Correspond to Vari...
- Characters on Display Do Not Match Keys Pressed
- Customize Menu Options Not Selectable
- Display Colors Are Different from Those Selected
- Display Is Incomplete or Hard to Read
- Error Message—3270 User Not Found
- Error Message—No 3270 Sessions
- Error Message—No 3270 Users
- Failed to Initialize Windowing System
- Fields Cannot Be Changed or Edited
- File Menu Options Not Selectable
- File Transfer Process “Hung”
- HLLAPI Application Does Not Work
- Host Response Times Option Not Selectable
- Last Transaction Time Indicator (LTTI) on Status L...
- Main Screen Invoked Instead of 3270 Session
- Model Type Radio Group Is Not Selectable
- Open Option Is Not Selectable
- Style File Contains Invalid Maximum Structured Fie...
- Unable to Obtain System Semaphores
- Overview
- Functions within Groups and Corresponding Keys
- Alphabetical List of Functions and Corresponding K...
- Overview
- How the Status Line Is Displayed
- Overview of the Status Line
- Session Status Messages
- Do Not Enter Messages
- Communications Check Codes
- Last Transaction Time Indicator
- Cursor Width Indicator
- Numeric Indicator
- Insert Indicator
- Printer Identifier
- Record/Replay ID
- Host Session
- Cursor Position Message
- Session ID
- Program Check Codes
- Overview
- Menu Interface File Transfer Messages
- Host File Transfer Messages
- Overview
- Command Format
- Output
- Error Messages
- Overview
- Overriding Host Domain Names
- Overview
- Specifying Output Method
- SPOF Format
- Model Control Commands

92 Chapter 3
Getting Started with 3270 Emulation
Keystroke Recording and Replay
You can use the RECORD key while recording is paused, to stop
recording and store the keystrokes you have entered, or the QUIT key to
abandon recording. Each of these keys works as if the PAUSE key had
not been pressed.
Step 2. After typing any variable data, press the PAUSE key again. The status
line display is restored; recording continues as usual.
Step 3. You can repeat Steps 1 and 2 later during recording if you need more
than one pause in the sequence.
Step 4. Take the usual steps to save the recorded key sequence.
Step 5. When you replay the key sequence, the replay stops at the point where
you entered the PAUSE key. The message REPLAY
PAUSED replaces REPLAY nn on the status line.
Step 6. Type in the appropriate keystrokes.
Step 7. Press the REPLAY key (default keystroke Esc P) to continue. The
sequence continues with the keystrokes you entered after the end of the
pause during recording.
Alternatively, if you want to stop the replay at this point, press the QUIT
key (default keystroke Ctrl + T).
Clearing a Recorded Keystroke Sequence
If you have recorded a key sequence that you no longer want to use, you
can clear it so that the PF key no longer has a key sequence associated
with it by using the following procedure:
Step 1. Press the RECORD key (default keystroke Esc
S), and then the PF key that identifies the sequence you want to clear, as
though you were recording a new sequence for this PF key.
A warning beep sounds (unless you turned off the “Enable emulator
beep” option in the Customize Miscellaneous Options dialog box), to
remind you that this PF key already has a key sequence assigned.
Step 2. To clear the keystroke sequence, press the DELETE key (default
keystroke Del). The sequence is cleared; this PF key no longer appears in
the list of PF keys associated with keystroke sequences.