
Smart Plug-in for WebLogic Server User's Guide


Chapter 2: Installing & Configuring the WebLogic Server SPI
How to Install & Configure WLS-SPI
2-3
How to Install & Configure WLS-SPI
To install and configure WLS-SPI, complete the tasks in the order listed:
" Task 1: Install on the HP-UX Management Server
" Task 2: (optional) Configure the Management Server to Launch your
Web Browser
" Task 3: Assign Operator Responsibilities for Administrator
" Task 4: Add Nodes to the WLS-SPI Node group
" Task 5: Distribute Actions, Monitors, Commands
" Task 6: Configure a WebLogic Server User
" Task 7: Configure Server Connections and Graphs
" Task 8: Distribute WLS-SPI Templates
TASK 1: INSTALL ON THE HP-UX MANAGEMENT SERVER
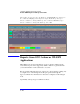
To install the WebLogic Server SPI, you can use a swinstall command (from
the command line) for both HP-UX or Solaris systems. For HP-UX systems, you
can also use the graphical user interface (GUI), but the GUI method is not
covered in this section due to the numerous differences in displays for the
various HP-UX versions.
Prerequisite/pre-installation information: OpenView Operations (OVO)
management server must be installed. It is not necessary to stop OVO sessions
before beginning the WLS-SPI installation.
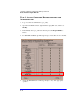
To install all bundles for an HP-UX management server, enter:
/usr/sbin/swinstall -s /cdrom/WLSSPI_HPUX_ITO_A.01.00.DEPOT WLSSPI
To install all bundles for a Solaris* management server, enter:
/usr/sbin/swinstall -s /cdrom/WLSSPI_SOL_ITO_A.01.00.DEPOT WLSSPI
* For managing SOLARIS managed nodes from an HP-UX management server, install the
HP-UX version, NOT the SOLARIS version.