
Managing Systems and Workgroups: A Guide for HP-UX System Administrators

Administering a Workgroup
How To:
Chapter 9884
Step 2. Go to Disks and File Systems/Disk Devices.
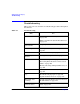
For each disk this screen shows you:
• Hardware path (e.g., 52.6).
• Usage (e.g., LVM).
• Volume group (e.g., vg00).
• The disk’s total capacity.
(The usable space will be somewhat less than this, probably about
15% less altogether, depending on the setting of the minfree kernel
parameter; see “Setting Up Logical Volumes for File Systems” on
page 563.)
• The disk’s model number and in some cases the name of its device
driver, for example, HP C3010 SCSI Disk Drive.
Use the above information to begin the diagram: group the disks into
their volume groups and fill in their hardware addresses and sizes; you
may also want to add the model number (e.g., HP C3010) and device
driver name (e.g., SCSI).
Step 3. For each disk, pull down the Actions menu and select View More
Information.
The screen that pops up shows you the following information:
• The device file name(s) of the logical volume(s) that occupy the disk.
• How each logical volume is being used (e.g., HFS, Swap/Dump).
• The amount of space, in megabytes, being used on this disk by each
logical volume.
If a logical volume is spread over more than one disk, you can use
this screen to see how the space is shared among the disks.
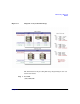
For example, on the system shown in the diagram, logical volume
lvol1 of volume group vg02 is distributed across two disks, c0t2d0
and c0t5d0.
By selecting each disk in turn and choosing View More
Information, you can see that this logical volume occupies all of
c0t2d0 and 356 MB of c0t5d0 for a total of 1000 MB.