
Managing Systems and Workgroups: A Guide for HP-UX System Administrators

Administering a System: Managing Disks and Files
Managing File Systems
Chapter 6 647
mount -F hfs -o ro /dev/vg00/rlvol4
Step 4. Mount the new JFS file system read-write on a temporary mount point.
For example:
mkdir /new-home
mount -F vxfs -o rw /dev/vg00/rlvol5 /new-home
Step 5. Copy the files from the old HFS file system to the newly created JFS file
system using cpio (1), tar (1), fbackup (1M), or another tool of your choice.
For example,
cd /home; tar -cvf * | (cd /new_home; tar -xvf -)
Step 6. If there are ACLs to be converted, record the ACLs from files in the old
HFS file system, and apply corresponding JFS ACLs to the same files in
the new JFS file system. You may want to write a script to do this. See
“Managing Access to Files and Directories” on page 753 for more
information about HFS and JFS ACLs.
Step 7. Consider how the file system will be used and select mkfs and mount
options based on your needs. See mkfs_vxfs (1M) and mount_vxfs (1M)
for details. Also see “JFS and the mount Command” on page 94 for
information about JFS mount options.
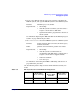
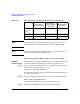
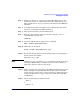
Step 8. Copy the /etc/fstab file to a safe location. For example:
cp /etc/fstab /etc/fstab.save
Step 9. Edit the /etc/fstab file to comment out the HFS entry for the file
system being replaced, and to add an entry for the new JFS file system.
For example, in the excerpt below the hfs entry for lvol4 is commented
out and the vxfs entry for lvol5 has been added:
vi /etc/fstab
/dev/vg00/lvol1 / hfs defaults 0 1
#/dev/vg00/lvol4 /home hfs defaults 0 2
/dev/vg00/lvol5 /home vxfs rw,suid,delaylog 0 2
/dev/vg00/lvol6 /tmp hfs defaults 0 2
/dev/vg00/lvol7 /usr hfs defaults 0 2
/dev/vg00/lvol8 /var hfs defaults 0 2
Step 10. Unmount both the old HFS file system and the new JFS file system.
umount /dev/vg00/lvol4 /dev/vg00/lvol5