
Managing Systems and Workgroups: A Guide for HP-UX System Administrators


Administering a System: Managing Disks and Files
Managing File Systems
Chapter 6 615
Checking an HFS File System
To check an HFS file system, use the following procedure:
Step 1. Before running fsck, make sure that a lost+found directory is present
and empty at the root for each file system you plan to examine. fsck
places any problem files or directories it finds in lost+found.
If lost+found is absent, rebuild it using mklost+found (1M).
Step 2. For mountable file systems, prepare to unmount the file system by
terminating all processes running on it, closing any open files.
For the root file system, execute shutdown (without -h or -r) to enter the
single-user state. The root file system cannot be unmounted.
Step 3. Unmount the (mountable) file system using SAM or the umount
command.
Step 4. Run fsck.
NOTE The -n or -N options run fsck in nondestructive mode, and are the safest
options available. You can run them on a mounted file system as a
precautionary measure when you suspect you might be having problems.
The following text documents the traditional -p option in more detail.
The -p option of fsck allows you to fix many file system problems,
running noninteractively. (See fsck (1M) for information on syntax and
options.) If fsck either finds no errors or finds correctable errors, it
corrects any such errors and prints information about the file system it
checked. If fsck encounters a problem it cannot correct while running
with the -p option, it will terminate with an error message.
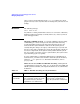
Step 5. Use the following table to determine what to do next based on three
possible outcomes:
Table 6-6 fsck Results
If fsck reports... Proceed to... Then...
No errors Step 6 You are done
Errors and corrects them all Step 7 Step 10