
Managing Systems and Workgroups: A Guide for HP-UX System Administrators


Administering a System: Booting and Shutdown
Booting Systems
Chapter 5 477
To list and configure an HP-UX boot device’s AUTO file from the EFI Shell
use EFI Shell commands (such as cd, ls, and edit) to display and edit
the EFI\HPUX\AUTO file on the selected device.
Step 1. Access the EFI Shell environment using the server’s (or nPartition’s)
system console. Access the system console either via the server’s
management processor (MP) or via a hardwired console terminal.
If necessary, interrupt the autoboot process by hitting a key during the
autoboot time-out period. The EFI Boot Manager will display the boot
options menu (the EFI main menu).
From the boot options menu, select EFI Shell.
Step 2. Select the device with the AUTO file that you want to change!
IMPORTANT Do not forget this step, especially if you have multiple bootable devices.
On HP Integrity Servers every bootable device can have its own AUTO file.
If you have not selected the device containing the AUTO file you want to
change, you might be editing an AUTO file on a different device.
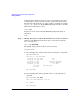
To list all currently mapped file systems, enter map at the EFI Shell
prompt:
Shell> map
The map command displays all file systems that are known and have
been mapped. For example:
fs0 : Acpi(HWP0002,500)/Pci(2|0)/Ata(Primary,Master)/HD(Part1,Sig
88F40A3A-B992-11E1-8002-D6217B60E588)
fs1 : Acpi(HWP0002,500)/Pci(2|0)/Ata(Primary,Master)/HD(Part3,Sig
88F40A9E-B992-11E1-8004-D6217B60E588)
blk0 : Acpi(HWP0002,500)/Pci(2|0)/Ata(Primary,Master)
blk1 : Acpi(HWP0002,500)/Pci(2|0)/Ata(Primary,Master)/HD(Part1,Sig
88f40A3A-B992-11E1-8002-D6217B60E588)
blk2 : Acpi(HWP0002,500)/Pci(2|0)/Ata(Primary,Master)/HD(Part1,Sig
88f40A6C-B992-11E1-8003-D6217B60E588)
blk4 : Acpi(HWP0002,500)/Pci(2|0)/Ata(Secondary,Master)