
Installing and Administering LAN/9000 Software


Chapter 3 45
Manually Installing and Configuring LAN/9000
Creating a New Kernel for HP 9000 Systems
5. Make a copy of the existing kernel (default name vmunix).
6. Regenerate the kernel with mk_kernel, using the edited system file
as input. mk_kernel creates the new hp-ux kernel (the default is
/stand/build/vmunix_test).
mk_kernel
In this example a new kernel is created in the build directory called
vmunix_test.
mk_kernel -s /stand/system -o /stand/vmunix
This second example automatically moves the kernel to the /stand
directory and makes a backup (/stand/vmunix_prev) if the file
/stand/vmunix already exists.
7. If you did not use the -o option with the mk_kernel command, copy
the new kernel to /stand/vmunix.
8. If you have additional LAN adapters to add to your system, follow the
appropriate directions; otherwise skip to step 9 below.
9. Reboot on the new kernel. If the new kernel fails to boot, boot the
system from the backup kernel and repeat the process of creating a
new kernel. To do so, follow the instructions in your System
Administration manual.
10.Proceed to the section “Verifying LAN Device Files,” in this chapter to
continue configuring LAN/9000 manually. To configure your system
with the SAM utility, proceed to chapter 2, “Configuring LAN/9000
Using SAM.”
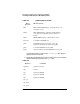
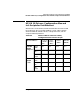
netdiag1
tun required for PPP
Table 3-2
Keyword Comments