
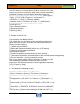
HP-UX HB v13.00 Ch-13 - LVM

HP-UX Handbook – Rev 13.00 Page 65 (of 110)
Chapter 13 LVM
October 29, 2013
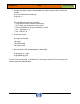
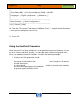
1. Obtain the PV key using the -k option of lvdisplay:
# lvdisplay –v –k /dev/vg01/lvol1
...
...
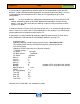
--- Logical extents ---
LE PV1 PE1 Status 1 PV2 PE2 Status 2
00000 0 00000 stale 1 00000 current
00001 0 00001 stale 1 00001 current
00002 0 00002 stale 1 00002 current
00003 0 00003 stale 1 00003 current
00004 0 00004 stale 1 00004 current
00005 0 00005 stale 1 00005 current
00006 0 00006 stale 1 00006 current
00007 0 00007 stale 1 00007 current
Compared to the output above the ??? have been replaced with the PV key (= 0).
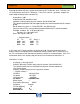
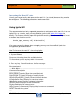
NOTE: You can use the xd(1) command to display the PV key because it is
stored at a fixed position in the LVM header, exactly 8222 bytes from the
beginning of the disk:
# xd –j8222 -N2 /dev/rdsk/c1t6d0
NOTE: Sometimes you see messages like PV[X] is POWERFAILED in
syslog.
In this case X is the PV key.
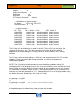
2. Reduce the mirror with the obtained key as argument:
# lvreduce –k –m 0 /dev/vg01/lvol1 0
3. After that the PV can be removed from the VG:
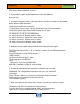
# vgreduce -f vg01
skip alternate link /dev/dsk/c1t2d2
vgreduce: Couldn't query physical volume "/dev/dsk/c0t11d0":
The specified path does not correspond to physical volume attached to
this volume group
PV with key 0 sucessfully deleted from vg vg01
Repair done, please do the following steps.....:
1. save /etc/lvmtab to another file
2. remove /etc/lvmtab
3. use vgscan(1m) -v to re-create /etc/lvmtab
4. NOW use vgcfgbackup(1m) to save the LVM setup