
HP-UX HB v13.00 Ch-13 - LVM

HP-UX Handbook – Rev 13.00 Page 62 (of 110)
Chapter 13 LVM
October 29, 2013
If you cannot use vgcfgrestore to write the original LVM header back to the new disk
because a valid LVM configuration backup file (/etc/lvmconf/vgXX.conf[.old]) is missing
or corrupted you have to remove that PV from the VG (vgreduce) to get a clean
configuration.
NOTE: In such situations the vgcfgrestore command may fail to restore the LVM
header, complaining about a ‘Mismatch between the backup file and the running
kernel’. If you are 100% sure that your backup is valid you may override this check
using the –R option.
In order to remove a PV from a VG you have to free it first, i.e. remove all logical extents
from it. If the LVs on such a disk is not mirrored data is lost anyway. If it is mirrored you
need to reduce the mirror before removing the PV.
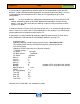
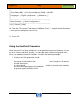
A ghost disk is usually indicated by vgdisplay reporting more current PVs than active
ones. Additionally LVM commands may complain about the missing PVs:
# vgdisplay vg01
vgdisplay: Warning: couldn't query physical volume "/dev/dsk/c0t11d0":
The specified path does not correspond to physical volume attached to
this volume group
vgdisplay: Couldn't query the list of physical volumes.
--- Volume groups ---
VG Name /dev/vg01
VG Write Access read/write
VG Status available
Max LV 255
Cur LV 3
Open LV 3
Max PV 16
Cur PV 2 (number of PVs recorded in the lvmtab)
Act PV 1 (number of PVs recorded in the kernel)
Max PE per PV 1016
VGDA 2
PE Size (Mbytes) 4
Total PE 511
Alloc PE 38
Free PE 473
Total PVG 0
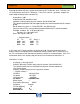
Note that the PV c0t11d0 is still recorded in lvmtab: