
HP-UX HB v13.00 Ch-13 - LVM


HP-UX Handbook – Rev 13.00 Page 33 (of 110)
Chapter 13 LVM
October 29, 2013
# vgexport -v -s -m /tmp/vgXX.map vgXX
If you specify -s in conjunction with the -m option vgexport simply adds the VG-ID to the
mapfile:
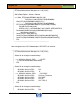
# cat /tmp/vgXX.map
VGID bfb13ce63a7c07c4
1 lvol1
2 lvol2
3 lvsap
4 lvdata
When using the -s option with the vgimport command on system B all disks that are
connected to the system are scanned one after another. If the VG-ID listed in the
mapfile is found on the header of a disk this disk is included automatically into the VG
Here’s the appropriate vgimport command:
# vgimport -v -s -m /tmp/vgXX.map vgXX
So you do not have to specify the PVs anymore.
ATTENTION: On systems using data replication products like BusinessCopy/XP,
ContinousAccess/XP, EMC SRDF or EMC Timefinder it may be impossible to reliably
identify the correct list of PVs using this VG-ID mechanism. You should specify the
list of PVs explicitely here.
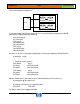
MirrorDisk/UX
Basic functionality
To be able to mirror LVs you need to purchase the product MirrorDisk/UX. Its important
to remember that LVs are mirrored - not PVs. Especially the LVM header is not mirrored
because it does not belong to the LV. You can have 1 or 2 mirror copies.
Here’s how to mirror an existing LV to a specific PV:
# lvextend -m 1 /dev/vg01/lvol1 /dev/dsk/c1t0d0
NOTE: lvextend allows either to specify the size of a LV (-L or -l) OR the number
of mirror copies (-m). You cannot specify both within one command.
lvdisplay shows a mirrored LV like this: