
HP-UX HB v13.00 Ch-13 - LVM


HP-UX Handbook – Rev 13.00 Page 32 (of 110)
Chapter 13 LVM
October 29, 2013
Importing and exporting VGs
The functionality of exporting VGs allows you to remove all data concerning a dedicated
VG from the system without touching the data on the disks. The disks of an exported
VG can be physically moved to another system and the VG can be imported there.
Exporting a VG means the following: remove the VG and corresponding PV entries from
/etc/lvmtab and remove the VG directory with their device files in /dev. Again - the data
on the disks is left unchanged.
Since the structural layout of the LVM information on disk has not changed throughout
the HP-UX releases you can import a VG that has been created on a UX 10.20 system
e.g. on a UX 11.11 system.
vgexport has a -m option to create a so called mapfile. This ascii file simply contains the
LV names because they are not stored on the disks. You need a mapfile if you do not
have the standard names for the LV device files (lvol1, lvol2, ...).
Here’s the procedure to export a VG on system A and import it on system B:
on system A:
Umount all LVs that belong to the VG and deactivate it:
# vgchange -a n vgXX
Export the VG:
# vgexport -v -m /tmp/vgXX.map vgXX
Now all information about vgXX has been removed from system A. The disks can now
be moved to system B and the VG can be imported there:
on system B:
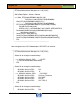
Create the directory for the LV device files and the group file. It is important to choose a
minor number that is unique on system B.
# ll /dev/*/group
# mkdir /dev/vgXX (you could also choose another VG name)
# mknod /dev/vgXX/group c 64 0xXX0000
Now copy the mapfile from system A and import the VG:
# vgimport -v vgXX -m /tmp/vgXX.map /dev/dsk/c1t0d0 /dev/dsk/c1t1d0
NOTE: The PV device files may be different on system B compared to system A.
If you have a bunch of disks in the VG you may not want to specify each of them within
the argument list of vgimport. Using the -s option with vgexport/vgimport lets you get
around this: