
HP-UX 11i Version 1.6 Installation and Configuration Guide


Installing HP-UX 11i Version 1.6
How to Install HP-UX 11i Version 1.6
Chapter 364
NOTE The remaining steps take you through the Guided Installation. For help,
consult the Help screens. For more help on using
Advanced Installation,
see the Ignite-UX Administration Guide.
Continue with Guided Installation
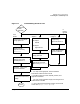
Step 1. You are now at the first step of the Install HP-UX Wizard: Select an
overall system configuration. Accept the default option: HP-UX B.11.22
Default.
Step 2. Select a system environment. In this step you will choose the type of
Operating Environment that will be installed on your system. Press
Enter to view the choices.
For Technical Computing OE media, the choices are:
x Environments: [HP-UX 11i TCOE-64bit ->] (HP-UX B.11.22) x
x HP-UX 11i MTOE-64bit x
x HP-UX 11i Base OS-64bit x
For 11i OE media, the choices are:
x Environments: [HP-UX 11i OE-64bit ->] (HP-UX B.11.22) x
x HP-UX 11i Base OS-64bit x
For Minimum Technical media, the choices are:
x Environments: [HP-UX 11i MTOE-64bit ->] (HP-UX B.11.22) x
x HP-UX 11i Base OS-64bit x
Step 3. Select a root disk. In this step you will choose the disk that will house
your root filesystem. If you are unsure of what to choose, keep the default
selection which has been calculated by the install program. Press
Enter to
view the choices.
Step 4. Specify the amount of root swap space. Some initial calculations have
been performed by the install program, and a recommended value has
been set for you. You can either accept this value or change it before
continuing. Press
Enter to view the choices.