
HP-UX 11i Version 1 Installation and Update Guide, June 2004


Cold Installing HP-UX 11i v1
Installing HP-UX 11i v1
Chapter 5 99
•Use the Tab key to navigate between fields and the arrow keys to
navigate within fields.
• Press Return/Enter to select an item. Pressing Return/Enter or the
space-bar opens a menu list.
• To navigate more quickly, enter the underlined letter of an item (such
as
I for Install HP-UX).
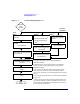
Step 8. Select: Install HP-UX
a. From the User Interface and Media Options screen, choose:
• Source Location Options: Media-only installation
• User Interface Options: Guided Installation — provides an install
wizard with limited choices. Select if you are not familiar with
Ignite-UX.
Alternately, select Advanced Installation to see tabbed screens,
enabling you to customize your system. Use this mode to change
LVM or VxVM settings and set system parameters, network
services, file-system characteristics, and other configuration
details. Minimum file-system requirement are listed on page 61.
You can exit Guided Installation and restart the configuration using
Advanced Installation at any time by either selecting the Cancel
button or pressing
C. Make your choices and select OK.
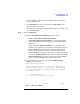
b. If your system has a tape drive attached, the Media Installation
Selection
screen appears:
Media Installation Selection
This screen provides an option to switch the install source
from the default CD/DVD to a recovery tape. This is helpful
for those systems and for tape devices which do not support
booting from a tape.
[ * ] CD/DVD Installation
[ ] Boot from CD/DVD, Recover from Tape
[ OK ] [ Cancel ] [ Help ]
Tab to [ OK ] and hit Enter.