
HP-UX 11i Version 1 Installation and Update Guide, June 2004


Updating to HP-UX 11i v1
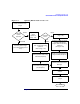
How to Update to HP-UX 11i v1
Chapter 6116
Optional Step: Create a Network Depot
HP-UX 11i v1 is delivered on three CDs or one DVD. If you are using
CDs, you will need to swap CDs during the update process. If you want to
update without having to swap CDs, you can either use DVD media or
you can create a remote depot on an existing 11i system that contains all
the necessary software, then update from that single source.
NOTE If you are now attempting to update your system from a network depot,
start with “Step 1: Install the update-ux Command (Required Task!)” on
page 118
As root, follow this procedure to create a network depot from the HP-UX
11i v1 CDs or DVD onto a depot server or other system running HP-UX
11i v1 in your network:
Step 1. Verify that you have at least 2,055 MB of free space to create the network
depot on another system in your network. If this space is not available,
use sam to either create a new volume group or extend an existing
volume group. For help, see either SAM help or the Managing Systems
and Workgroups manual.
Step 2. Log in as root and mount the logical volume on a new directory named
/update. This directory will hold your network depot.
Step 3. Insert the HP-UX 11i v1 CD1 or DVD and wait for the drive’s busy light
to stop blinking.
Step 4. Find the CD-ROM or DVD-ROM device file name:
ioscan -f -C disk | more
/dev/dsk/c1t2d0 is a typical CD-ROM device name.
Step 5. Create the directory under root(/):
•CD-ROM: mkdir /cdrom
•DVD: mkdir /dvdrom
Step 6. Mount the CD or DVD onto the new directory as a file system. For
example:
•CD-ROM: mount /dev/dsk/c1t2d0 /cdrom
•DVD: mount /dev/dsk/c1t2d0 /dvdrom