
HP-UX 11i Version 1 Installation and Update Guide, June 2003


Install/Update System Requirements
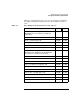
Disk Space and Memory Requirements
Chapter 3 65
1. Remove the current dump device:
lvrmboot -v -d lvol2 /dev/vg00
2. Add a new dump device:
lvlnboot -d /dev/vg00/swap
3. Remove the current swap device:
lvrmboot -s /dev/vg00
4. Add a new swap device:
lvlnboot -s /dev/vg00/swap
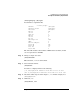
Step 4. Verify your change by entering:
lvlnboot -v
Boot Definitions for Volume Group /dev/vg00:
Physical Volumes belonging in Root Volume Group:
/dev/dsk/c0t6d0 (8/0/19/0.6.0) -- Boot Disk
Boot: lvol1 on: /dev/dsk/c0t6d0
Root: lvol3 on: /dev/dsk/c0t6d0
Swap: swap on: /dev/dsk/c0t6d0
Dump: swap on: /dev/dsk/c0t6d0, 0
Step 5. If your changes are correct, reboot the system.
Step 6. After the system reboots, view swap information by entering:
swapinfo
Kb Kb Kb PCT START/ Kb
TYPE AVAIL USED FREE USED LIMIT RESERVE PRI NAME
dev 307200 45936 216208 0% 0 - 1 /dev/vg00/swap
reserve - 113748 -113748
memory 85584 23492 62092 27%
Step 7. To verify that the same configuration exists as before the reboot, enter
(again):
lvlnboot -v
Step 8. As root, use sam to remove the old lvol2 entry from /dev/vg00.