
HP-UX 11i Version 1 Installation and Update Guide, December 2004


Cold-Installing HP-UX 11i v1
Cold-Installing HP-UX 11i v1
Chapter 582
— Advanced Installation enables you to customize your system
on tabbed screens. Use this mode to change VxVM settings. You
may also find it convenient to set system parameters, network
services, file-system characteristics, and other configuration
details. For more help on using Advanced Installation, refer to
the Ignite-UX Administration Guide.
— No User Interface uses all the defaults and begins the session.
The remaining sections take you through the Guided Installation option.
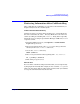
Step 3. If your system has a tape drive attached, the Media Installation
Selection screen appears:
Media Installation Selection
This screen provides an option to switch the install source
from the default CD/DVD to a recovery tape. This is helpful
for those systems and for tape devices which do not support
booting from a tape.
[ * ] CD/DVD Installation
[ ] Boot from CD/DVD, Recover from Tape
[ OK ] [ Cancel ] [ Help ]
Step 4. Tab to [ OK ] and press Enter.
Task 3: Configuring Your Installation
At this point, the system displays the Install HP-UX Wizard screen for
the HP-UX installation process. You are now at the first step of the
Install HP-UX Wizard. This section describes how to configure your
installation using the Guided Installation process.
Step 1. From the Install HP-UX Wizard screen, select an overall system
configuration. Press
Enter to accept the default option, HP-UX B.11.11
Default. The system displays the Operating Environment screen.
Step 2. From the Operating Environment screen, select the type of Operating
Environment you want to install on your system. Press
Enter to view the
choices.
Step 3. On the Root Disk screen select the disk to store your root file system.
Press
Enter to view the choices. If you are unsure of what to choose, keep
the default selection that has been calculated by the install program.