
HP-UX 11i Version 1 Installation and Update Guide, December 2004


Cold-Installing HP-UX 11i v1
Cold-Installing HP-UX 11i v1
Chapter 580
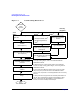
Task 1: Booting Your Machine
This task describes how to boot your system from the install media.
Step 1. Make sure any external devices connected to the target system are
turned on and operational.
Step 2. Insert the HP-UX 11i v1 CD or DVD into the drive.
Step 3. Stop the autoboot by pressing
Esc on workstations or any key on servers.
The boot console menu is displayed. If you need help, enter HELP
Step 4. Ensure that Fast Boot is enabled.
a. Select the Configuration Menu CO
b. If the Fast Boot selection is available, switch Fast Boot ON:
FB ON
c. Return to the Main Menu MA
(Switch Fast Boot back OFF after installing HP-UX 11i.)
The full memory check that is run when Fast Boot is OFF may take
several hours on a large system.
Step 5. Search for bootable devices, using the choices displayed (for example,
enter search or sea). A table similar to this is displayed:
Path# Device Path Device Type
----- ----------- -----------
P0 SCSI HP DVD-ROM
P1 LAN.1.2.3.4.5.6 1.2.3.4
P2 FWSCSI.6.0 IBM DDRS-34560WS
Of the media listed, a SCSI device (FWSCSI) is usually a disk, whereas a
single-ended SCSI device (SCSI) can be a disk, CD or DVD drive.
Step 6. Boot from the CD or DVD drive using the listed path number. For the
drive shown in the previous example (P0), enter BOOT P0
Step 7. After a few minutes, at the Interact with IPL? prompt press n.
The install kernel loads (3-5 minutes), after which a screen might
prompt you to enter the keyboard language of your console.
Step 8. Enter the number and press
Enter again to confirm.