
HP-UX 11i Version 1 Installation and Update Guide, December 2003

Cold Installing HP-UX 11i v1
Installing HP-UX 11i v1
Chapter 5110
You may have pressed Enter before changing the CD or DVD. If so, verify
that you have changed the CD/DVD and then select the displayed
Recovery Action 1:
Retry software Load... and press Enter again.
Step 12. The system automatically reboots after all software has been loaded.
Eject the last CD or DVD. Be sure to store all CDs or DVDs in a safe
place. You may need them later to install drivers or to install or change
the OE.
If you specified Ask at first boot during the installation screens, the
set_parms command runs now so you can set the root password, date,
time, time zone, IP address, and other network parameters. You may
need to customize NFS mounts, gateways, file systems, and so forth after
you log in. Changes to the kernel, such as adding devices, will require a
reboot to enable them.
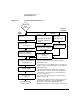
Step 13. The depot named GOLDQPK11i includes two quality pack bundles,
GOLDBASE11i, which provides defect fixes for the Base OE (including the
always-installed and selectable driver products), and GOLDAPPS11i,
which provides defect fixes for the OE applications.
After installing or updating applications, insert the HP-UX Support Plus
CD and install the Quality Pack patch bundles to fix defects in the
operating system and OE applications in order to ensure your system is
functioning at the highest quality. For example:
/usr/sbin/swinstall -s /cdrom/GOLDQPK11i \
-x patch_match_target=true -x autoreboot=true
For more about this package, see the Quality Pack page available at the
following web site:
http://software.hp.com/SUPPORT_PLUS/qpk.html
Problems? If you encounter a problem during the cold-install process, first review
Appendix B, “Known Problems and Troubleshooting,” on page 169 for
possible solutions.
You can also find help on this web site:
http://forums.itrc.hp.com/